Tuesday, 28 January 2014

Pipe-in-Pipe New Design

Increasing demand for energy, matched with high commodity prices and advances in technology, are driving operators to extract whatever reserves remain in the challenging UK continental shelf. Therefore, the requirement to transfer these multi-phase products from often high-pressure/high-temperature (HP/HT) wells back onshore is an even more demanding prospect.

Up until now, the common belief in the industry was that pipe-in-pipe systems able to withstand environmental challenges such as corrosion, structural integrity, and thermal management, would be too costly and complex to apply to riser systems.

Tata Steel worked closely with supply partners to engineer, procure, and construct these assemblies to further develop this innovative technology as a cost-effective solution to flow assurance issues.

Need for insulation

HP/HT fields are technically more complex to develop because of the inherently higher energy in the well fluid and its multi-phase composition. Managing the extreme pressure and operating temperature must be based and evaluated on criteria such as corrosion, maintaining structural integrity, and thermal management.

One particular challenge is the management of pipeline shutdown. Less expensive solutions for managing the insulation of bends such as wet coatings, compromise overall shutdown times due to reduced thermal efficiency. Solutions, such as "self-draining" spools, present a significant design challenge that can be mitigated by the inclusion of pipe-in-pipe bends, enabling the same thermal integrity to be maintained in the whole line.

Tata Steel has previously implemented a solution for pipe-in-pipe bends for a North Sea development. Since then, new insulation techniques have been developed that give far superior insulation properties.

Risers, spools, and bends

The main challenge with the construction of pipe-in-pipe bends is how to pass the inner flowline bend into the outer casing pipe. It is important that pipe bends have a straight portion on the end to enable efficient welding to the next pipe section and this can present the insertion of one bend into the other.

The second construction challenge is efficient insulation. Wrapping or sheathing is simply not practical here as the insulation would occupy the annulus of the assembly and prevent the integration.

New insulation system

Drawing of the geometry of one pipe into another.

Drawing of the geometry of one pipe into another.

The system developed by Tata Steel overcomes these problems by deploying granular Nanogel insulation into the annulus of the pipe-in-pipe system. Nanogel is made by first forming a silica gel, then expelling the water from the silica matrix. The resulting material is granular with trapped nanopores of air, inhibiting heat transfer by conduction, convection, and radiation (with the inclusion of an opacifier).

The deployment of a novel polymeric bulkhead, cast directly into the annulus, provides a solid barrier to retain the insulation, which allows for the relative movement of the inner and outer bends. The polymer is a "syntactic" material, silicone rubber with glass microspheres dispersed through the matrix with high strength, flexibility, and thermal efficiency. The tangent ends of the inner and outer bends are held rigidly to ensure that the assembly tolerances achieved at manufacture are retained when the unit is transferred to the welding contractor for incorporation into the pipeline spool or riser.

In order for the insulation to be effectively deployed and provide the consistent thermal performance, the annular gap throughout the assembly must be uniform. It is important the manufacturing tolerances of the pipe and bends are closely controlled.

Steel pipe and bend manufacture

Together with Tata Steel, Eisenbau Krämer (EBK) and the pipe bending plant of Salzgitter Mannesmann Grobblech (SMGB) have developed a series of controls, including a process and measurement system, to ensure all bend dimensions are closely controlled and mating bends can be produced, matched, and paired to ensure the most accurate assembly is produced.

In respect to the process-related thinning in the extrados of the hot induction bends, the wall thickness for the inner and outer mother pipes was increased accordingly. To match precisely, the mother pipes have been manufactured with the same ID as the riser pipes.

16-in. clad bends being transferred to the quenching tank after austenitization at SMGB pipe bending mill.

16-in. clad bends being transferred to the quenching tank after austenitization at SMGB pipe bending mill.

EBK supplied Tata Steel with the mother pipe, which has material properties that allow formation through hot induction bending. The main material challenges are to ensure the mechanical properties are suitable after bending. Therefore, SMGB is taking responsibility for the chemical design of the pre-material. This also involves the consideration of a series of heat treatment and forming processes. EBK uses a multi-pass welding process and steel plate from premium mills in Europe. The manufacturing process at EBK generates pipe of the closest dimensional control through a series of cold forming and sizing operations such as external calibration.

At the SMGB pipe bending plant, the special mother pipes are bent by hot induction bending. Heat is applied through electrical induction to the mother pipe materials and the pipe is slowly formed to give the correct geometry. In most pipeline applications the critical dimensions are the positions and attitudes of the ends of the bends (center-to-end dimension) to maintain the overall geometry of the pipeline. However, with pipe-in-pipe bends it is important that the bend radius is also accurately controlled to ensure the two bends can be integrated. The precise dimensions after bending also need to be maintained following heat treatment. For the inner clad bends, a full-body quench and temper heat treatment is applied at the SMGB bending mill in order to guarantee homogenized material properties for the bends, to fulfill mechanical and corrosion requirements.

HP/HT material properties

Additional material complexities have to be overcome. Generally, in HP/HT lines there are challenges because of corrosion, low temperature toughness, and strength. These parameters require careful material selection to maintain the balance of properties from the outset through to bend production. Thermal stresses need to be managed as the loads are shared between inner and outer pipe. In addition, the insulation can lead to extremes of temperature being retained in the pipe materials during operation and shutdown that can form challenging conditions for conventional steel products.

Conclusion

HP/HT well environments present some of the most challenging and technologically demanding conditions for field developments, not least because the properties in each reserve offer significant challenges in terms of material selection and design.

Tata Steel and its supply partners have expanded capabilities further with the design and creation of cost-effective insulated pipe-in-pipe bends for risers and spools - an accomplishment previously considered too difficult.

Pipe-in-pipe bends, while challenging technologically, can lead to simplification of overall pipeline design and can give better pipeline performance in times of operation and shutdown.

Reference: “New pipe-in-pipe design ensures effective insulation”, http://www.offshore-mag.com/articles/print/volume-73/issue-4/engineering-construction-installation/new-pipe-in-pipe-design-ensures-effective-insulation.html, January 2014.

Pipeline Buckling and Collapse

With ultra deepwater pipelines being considered for water depths of nearly 3,000 m, pipe collapse, in many instances, will govern design. For example, bending loads imposed on the pipeline near the seabed (sagbend region) during installation will reduce the external pressure resistance of the pipeline, and this design case will influence (and generally govern) the final selection of an appropriate pipeline wall thickness.

To date, the deepest operating pipelines have been laid using the J-lay method, where the pipeline departs the lay vessel in a near-vertical orientation, and the only bending condition resulting from installation is near the touchdown point in the sagbend. More recently, however, the S-lay method is being considered for installation of pipelines to water depths of nearly 2,800 m. During deepwater S-lay, the pipeline originates in a horizontal orientation, bends around a stinger located at the stern or bow of the vessel, and then departs the lay vessel in a near-vertical orientation. During S-lay, the installed pipe experiences bending around the stinger (overbend region), followed by combined bending and external pressure in the sagbend region.


Initial bending in the overbend during pipe installation may result in stress concentrations in pipe-to-pipe weld offsets or in pipe-to-buckle arrestor interfaces.

In light of these bending and external pressure-loading conditions, analytical work was performed to better understand the local buckling behavior of thick-walled line pipe due to bending, and the influence of bending on pipe collapse. Variables considered in the analytical evaluations include pipe material properties, geometric properties, pipe thermal treatment, the definition of critical strain, and imperfections such as ovality and girth weld offset.

Design considerations

As the offshore industry engages in deeper water pipeline installations, design limits associated with local buckling must be considered and adequately addressed. Instances of local buckling include excessive bending resulting in axial compressive local buckling, excessive external pressure resulting in hoop compressive local buckling, or combinations of axial and hoop loading creating either local buckling states. In particular, deepwater pipe installation presents perhaps the greatest risk of local buckling, and a thorough understanding of these limiting states and loading combinations must be gained in order to properly address installation design issues.

Initial bending in the overbend may result in stress concentrations in pipe-to-pipe weld offsets or in pipe-to-buckle arrestor interfaces. Initial overbend strains, if large enough, may also give rise to increases in pipe ovalization, perhaps reducing its collapse strength when installed at depth. Active bending strains in the sagbend will also reduce pipe collapse strength, as has been previously demonstrated experimentally.

Overall modeling approach

In an attempt to better understand pipe behavior and capacities under the various installation loading conditions, the development and validation of an all-inclusive finite element model was performed to address the local buckling limit states of concern during deepwater pipe installation. The model can accurately predict pipe local buckling due to bending, due to external pressure, and to predict the influence of initial permanent bending deformations on pipe collapse. Although model validation is currently being performed for the case of active bending and external pressure (sagbend), no data has been provided for this case.

The finite element model developed includes non-linear material and geometry effects that are required to accurately predict buckling limit states. Analysis input files were generated using our proprietary parametric generator for pipe type models that allows for variation of pipe geometry (including imperfections), material properties, mesh densities, boundary conditions and applied loads.

A shell type element was selected for the model due to increased numerical efficiency with sufficient accuracy to predict global responses. The Abaqus S4R element is a four-node, stress/displacement shell element with large-displacement and reduced integration capabilities.

All material properties were modeled using a conventional plasticity model (von Mises) with isotropic hardening. Material stress-strain data was characterized by fitting experimental, uniaxial test results to the Ramberg-Osgood equation.

Pipe ovalizations were also introduced into all models to simulate actual diameter imperfections, and to provide a trigger for buckling failure mode. This was done during model generation by pre-defining ovalities at various locations in the pipe model.

Bending case

A pipe bend portion of the model was developed to investigate local buckling under pure moment loading. Due to the symmetry in the geometry and loading conditions, only one half of the pipe was modeled, in order to reduce the required computational effort. The pipe mesh was categorized into four regions

  • Two refined mesh areas located over a length of one pipe diameter on each side of the mid-point of the pipe to improve the solution convergence (location of elevated bending strains and subsequent buckle formation)
  • Two coarse mesh areas at each end to reduce computational effort.

Clamped-end boundaries were imposed on each end of the pipe model to simulate actual test conditions (fully welded, thick end plate). Under these assumptions, the end planes (nodes on the face) of both ends of the pipe were constrained to remain plane during bending. Loading was applied by controlled rotation of the pipe ends.

In terms of material properties, the axial compressive stress-strain response tends to be different from the axial tensile behavior for UOE pipeline steels. To accurately capture this difference under bending conditions, the upper (compressive) and lower (tension) halves of the pipe were modeled with separate axial material properties (derived from independent axial tension and compression coupon tests).

In general, the local compressive strains along the outer length of a pipe undergoing bending will not be uniform due to formation of a buckle profile. In order to specify the critical value at maximum moment for an average strain, four methods were selected based on available model data and equivalence to existing experimental methods.

Collapse case

The same model developed for the bending case was used to predict critical buckling under external hydrostatic pressure. This included the use of shell type elements and the same mesh configuration. In the analyses, a uniform external pressure load was incrementally applied to all exterior shell element faces. Radially constrained boundary conditions were also imposed on the nodes at each end of the pipe to simulate actual test conditions (plug at each end). In contrast to the pipe bend analysis, only a single stress-strain curve (based on compressive hoop coupon data) was used to model the material behavior of the entire pipe.

Bending case validation

The pipe bend finite element model was validated using full-scale and materials data obtained from the Blue Stream test program, both for “as received” (AR) and “heat treated” (HT) pipe samples. Geometrical parameters were taken from the Blue Stream test specimens and used in the model validation runs. Initial ovalities based on average and maximum measurements were also assigned to the model. The data distribution reflects the relative variation in ovality measured along the length of the Blue Stream test specimens.


All of finite element models included analysis input files generated using parametric generator for pipe type models that allows for variation of pipe geometry (including imperfections), material properties, mesh densities, boundary conditions, and applied loads.

Axial tension and compression engineering stress-strain data used in the model validation were based on curves fit to experimental coupon test results. As pointed out previously, separate compression and tension curves were assigned to the upper and lower pipe sections, respectively, in order to improve model accuracy.

In the validation process, a number of analyses were performed to simulate the Blue Stream test results (base case analyses), and to investigate the effects of average strain definition, gauge length, and pipe geometry. These analyses, comparisons and results were:

  • The progressive deformation during pipe bending for the AR pipe bend showed the development of plastic strain localization at the center of the specimen
  • A comparison between the resulting local and average axial strain distributions for two nominal strain levels indicated that at the lower strain level the distribution of local strain is relatively uniform, at the critical value (peak moment) a strain gradient is observed over the length of the specimen with localization occurring in the middle, the end effects are quite small due to specimen constraint and were observed at both strain levels
  • The resulting moment-strain response for the AR pipe base case analysis found the calculated critical (axial) strain slightly higher than that determined from the Blue Stream experiments
  • The effect of chosen strain definition and gauge length on the critical bending strain for the AR pipe base case analysis, using the four methods for calculating average strain, gave similar results
  • The critical strain value is somewhat sensitive to gauge length for a variety of OD/t ratios
  • The finite element results are seen to compare favorably with existing analytical solutions and available experimental data taken from the literature. For pipe under bending, heat treatment results in only a slight increase in critical bending strain capacity.

Collapse case validation

Similar to the pipe bending analysis, the plain pipe collapse model was also validated using full-scale and materials data obtained from the Blue Stream test program, both for “as received” (AR) and “heat treated” (HT) pipe samples. Pipe geometry and ovalities measurements taken from the Blue Stream collapse specimens were used in the validation analyses. Initial ovalities based on average and maximum measurements were also assigned to the model at different reference points. Hoop compression stress-strain data was used in the model, and was based on the average of best fit curves from both ID and OD coupon specimens, respectively. To validate the pipe collapse model, comparison was made to full-scale results from the Blue Stream test program which demonstrated a very good correlation between the model predictions and the experimental results.

In addition to the base case, further analyses were run for a number of alternate OD/t ratios ranging from 15 to 35. Similar to the pipe bend validation, the OD/t ratio was adjusted by altering the assumed wall thickness of the pipe. The finite element results have compared favorably with available experimental data taken from the literature.

The beneficial effect of pipe heat treatment for collapse has resulted in a significant increase in critical pressure (at least 10% for an OD/t ratio of 15). The greatest benefit, however, is observed only at lower OD/t ratios (thick-wall pipe). This can be attributed to the dominance of plastic behaviour in the buckling response as the wall thickness increases (for a fixed diameter). At higher OD/t ratios, buckling is elastic and unaffected by changes in material yield strength.

Pre-bent effect on collapse

Finite element analyses were also performed to simulate recent collapse tests conducted on pre-bent and straight UOE pipe samples for both “as received” (AR) and “heat treated” (HT) conditions. The intent of these tests was to demonstrate that there was no detrimental effect on collapse capacity due to imposed bending as a result of the overbend process. In the pre-bend pipe tests, specimens were bent up to a nominal strain value of 1%, unloaded, then collapse tested under external pressure only.


To address the pre-bend effect on collapse, a simplified modeling approach was used whereby the increased ovalities and modified stress-strain properties in hoop compression due to the pre-bend were input directly into the existing plain pipe collapse model (the physical curvature in the pipe was ignored).

To address this loading case, a simplified modeling approach was used whereby the increased ovalities and modified stress-strain properties in hoop compression due to the pre-bend were input directly into the existing plain pipe collapse model (the physical curvature in the pipe was ignored).

A comparison between the predicted and experimental collapse pressures for both pre-bent and straight AR and HT pipes indicates that the model does a reasonable job of predicting the collapse pressure for both pipe conditions. It is also clear that the effect of moderate pre-bend (1%) on critical collapse pressure is relatively small.

While the pre-bend cycle results in an increased ovality in the pipe, this detrimental effect is offset by a corresponding strengthening due to strain hardening. As a result, the net effect on collapse is relatively small. For the AR pipe samples, there was a slight increase in collapse pressure when the pipe was pre-bent. Conversely, for the HT pipe, the opposite trend was observed. This latter decrease in collapse pressure can be attributed to two effects: the larger ovality that resulted from the pre-bend cycle and the limited strengthening capacity available in the HT pipe (the HT pipe thermal treatment increased the hoop compressive strength, offering less availability for cold working increases due to the pre-bend).

Similar to previous experimental studies on thermally aged UOE pipe, the beneficial effect of heat treatment was demonstrated in the pre-bend analysis. The collapse pressure for the pre-bent heat treated (HT) pipe is approximately 8-9% higher than that for the as received (AR) pipe, based on both the analytical and experimental results. This increase, however, is lower than that observed for un-bent pipe (approximately 15-20% based on analysis and experiments).

This unique case of an initial permanent bend demonstrated that the influence on the collapse strength of a pipeline was minimal resulting from an increase in hoop compressive strength (increasing collapse strength), and an increase in ovality (reducing collapse strength). This directly suggests that excessive bending in the overbend will not significantly influence collapse strength.

Future work includes advancing the model validation to the case of active bending while under external pressure. This condition exists at the sagbend region of a pipeline during pipelay and, in many cases, will govern overall pipeline wall thickness design.

Reference: “Understanding pipeline buckling in deepwater applications”, http://www.offshore-mag.com/articles/print/volume-66/issue-11/pipeline-transportation/understanding-pipeline-buckling-in-deepwater-applications.html, Janaury 2014.

Pipeline Crack Propagation

Polyethylene (PE) is the primary material used for gas pipe applications. Because of its flexibility, ease of joining and long-term durability, along with lower installed cost and lack of corrosion, gas companies want to install PE pipe instead of steel pipe in larger diameters and higher pressures. As a result, rapid crack propagation (RCP) is becoming a more important property of PE materials.

This article reviews the two key ISO test methods that are used to determine RCP performance (full-scale test and small-scale steady state test), and compare the values obtained with various PE materials on a generic basis. It also reviews the status of RCP requirements in industry standards; such as ISO 4437, ASTM D 2513 and CSA B137.4. In addition, it reviews progress within CSA Z662 Clause 12 and the AGA Plastic Materials Committee to develop industry guidelines based on the values obtained in the RCP tests to design against an RCP incident.

Background

Although the phenomenon of RCP has been known and researched for several years 1, the number of RCP incidents has been very low. A few have occurred in the gas industry in North America, such as a 12-inch SDR 13.5 in the U.S. and a 6-inch SDR 11 in Canada, and a few more in Europe.

With gas engineers desiring to use PE pipe at higher operating pressures (up to 12 bar or 180 psig) and larger diameters (up to 30 inches), a key component of a PE piping material - resistance to rapid crack propagation (RCP) - becomes more important.

Most of the original research work conducted on RCP was for metal pipe. As plastic pipe became more prominent, researchers applied similar methodologies used for metal pipe on the newer plastic pipe materials, and particularly polyethylene (PE) pipe 2. Most of this research was done in Europe and through the ISO community.

Rapid crack propagation, as its name implies, is a very fast fracture. Crack speeds up to 600 ft/sec have been measured. These fast cracks can also travel long distances, even hundreds of feet. The DuPont Company had two RCP incidents with its high-density PE pipe, one that traveled about 300 feet and the other that traveled about 800 feet.

RCP cracks usually initiate at internal defects during an impact or impulse event. They generally occur in pressurized systems with enough stored energy to drive the crack faster than the energy is released. Based on several years of RCP research, whether an RCP failure occurs in PE pipe depends on several factors:

  1. Pipe size.
  2. Internal pressure.
  3. Temperature.
  4. PE material properties/resistance to RCP.
  5. Pipe processing.

Typical features of an RCP crack are a sinusoidal (wavy) crack path along the pipe, and “hackle” marks along the pipe crack surface that indicate the direction of the crack. At times, the crack will bifurcate (split) into two directions as it travels along the pipe.

Test Methods

The RCP test method that is considered to be the most reliable is the full-scale (FS) test method, as described in ISO 13478. This method requires at least 50 feet of plastic pipe for each test and another 50 feet of steel pipe for the reservoir. It is very expensive and time consuming. The cost to obtain the desired RCP information can be in the hundreds of thousands of dollars.

Due to the high cost for the FS RCP test, Dr. Pat Levers of Imperial College developed the small-scale steady state (S4) test method to correlate with the full-scale test3. This accelerated RCP test uses much smaller pipe samples (a few feet) and a series of baffles, and is described in ISO 13477. The cost of conducting this S4 testing is still expensive, but less than FS testing. Several laboratories now have S4 equipment. A photograph with this article shows the S4 apparatus used by Jana Laboratories.

Whether conducting FS or S4 RCP testing, there are two key results used by the piping industry; one is the critical pressure and the other is the critical temperature.

The critical pressure is obtained by conducting a series of FS or S4 tests at a constant temperature (generally 0C) and varying the internal pressure. At low pressures, where there is insufficient energy to drive the crack, the crack initiates and immediately arrests (stops). At higher pressures, the crack propagates (goes) to the end of the pipe. The critical pressure is shown by the red line in Figure 1 as the transition between arrest at low pressures and propagation at high pressures. In this case, the critical pressure is 10 bar (145 psig).

Figure 1: Critical Pressure (Plot of crack length vs. pressure)
Data obtained at 0° C (32°F).

Due to the baffles in the S4 test, the critical pressure obtained must be corrected to correlate with the FS critical pressure. There has been considerable research within the ISO community conducted in this area. Dr. Philippe Vanspeybroeck of Becetel chaired a working group - ISO/TC 138/SC 5/WG RCP - that conducted S4 and FS testing on several PE pipes 4. Based on their extensive research effort, the WG arrived at the following correlation formula 5 to convert the S4 critical pressure (Pc,S4) to the FS critical pressure (Pc,FS):

Pc,FS = 3.6 Pc,S4 + 2.6 bar (1)

It is important to note that this S4/FS correlation formula may not be applicable to other piping materials, such as PVC or polyamide (PA). For example, Arkema has conducted S4 and FS testing on PA-11 pipe and found a different correlation formula for PA-11 pipe 6.

The critical temperature is obtained by conducting a series of FS or S4 tests at a constant pressure (generally 5 bar or 75 psig) and varying the temperature 7. At high temperatures the crack initiates and immediately arrests. At low temperatures, the crack propagates to the end of the pipe. The critical temperature is shown by the red line in Figure 2 as the transition between arrest at high temperatures and propagation at low temperatures. In this case, the critical temperature is 35°F (2°C).

Figure 2: Critical Temperature (Plot of crack length vs. temperature)
Data obtained at 5 bar (75 psig).

RCP In ISO

The International Standards Organization (ISO) product standard for PE gas pipe, ISO 4437, has included an RCP requirement for many years 8. This is because there were some RCP failures in early generation European PE gas pipes, and the Europeans had conducted considerable research on RCP in PE pipes. Also, European gas companies were using large-diameter pipes and higher operating pressures for PE pipes, both of which make the pipe more susceptible to RCP failures. Below is the current requirement for RCP taken from ISO 4437:

Pc > 1.5 x MOP (2)

Where: Pc = full scale critical pressure, psig
MOP = maximum operating pressure, psig

Most manufacturers use the S4 test to meet this ISO 4437 RCP requirement. If the requirement is not met, then the manufacturer may use the FS test. Therefore, the ISO 4437 product standard requires that RCP testing be done, and also provides values for the RCP requirement.

RCP In ASTM

Until recently, ASTM D 2513 did not address RCP at all 9. The AGA Plastic Materials Committee (PMC) requested that an RCP requirement be added to ASTM D 2513, similar to the RCP requirement in the ISO PE gas pipe standard ISO 4437. The manufacturers agreed to include a requirement in ASTM D 2513 that RCP testing (FS or S4) must be performed. The ASTM product standard D 2513 does not include any required values.

PMC has agreed with this approach and will develop its own industry requirement in the form of a “white paper.” 10 The first draft was just issued within PMC with the following proposed requirement:

  1. PC,FS > leak test pressure.
  2. Leak test pressure = 1.5 X MOP.


RCP In CSA

CSA followed the direction of ASTM. The product standard CSA B137.4 11 requires that the RCP testing must be done. The values of the RCP test will be stipulated in CSA Z662 Clause 12, which is the Code of Practice for gas distribution in Canada. Clause 12 recently approved the requirement as shown nearby.

12.4.3.6 Rapid Crack Propagation (RCP) Requirements

When tested in accordance with B137.4 requirements for PE pipe and compounds, the standard PE pipe RCP Full-Scale critical pressure shall be at least 1.5 times the maximum operating pressure. If the RCP Small-Scale Steady State method is used, the RCP Full-Scale critical pressure shall be determined using the correlation formula in B137.4.
(end of box)

RCP Test Data

The critical pressure is the pressure - below which - RCP will not occur. The higher the critical pressure, the less likely the gas company will have an RCP event. In most cases, as the pipe diameter or wall thickness increases, the critical pressure decreases. Therefore, RCP is more of a concern with large-diameter or thick-walled pipe. Following are some typical critical pressure values for various generic PE materials. For most cases, the pipe size tested is 12-inch SDR 11 pipe.

PE Material S4 Critical Pressure (PC,S4) at 32°F (0°C)/Full Scale Critical Pressure (PC,FS) @ 0°C

Unimodal MDPE 1 bar (15 psig)/6.2 bar (90 psig)
Bimodal MDPE 10 bar (145 psig) /38.6 bar (560 psig)

Unimodal HDPE 2 bar (30 psig)/9.8 bar (140 psig)
Bimodal HDPE (PE 100+) 12 bar (180 psig)/45.8 bar (665 psig)

In general, the RCP resistance is greater for HDPE (high-density PE) than MDPE (medium-density PE). However, there is a significant difference when comparing a unimodal PE to a bimodal PE material, about a ten-fold difference.

Bimodal PE technology was developed in Asia and Europe in the 1980s. This technology is known to provide superior performance for both slow crack growth and RCP, as evidenced by the table. For the bimodal PE 100+ materials used in Europe and Asia, the S4 critical pressure minimum requirement is 10 bar (145 psig), which converts to 560 psig operating pressure. This means that with these bimodal PE 100+ materials, RCP will not be a concern. Today, there are several HDPE resin manufacturers that use this bimodal technology. Recently, a new bimodal MDPE material was introduced for the gas industry 12,13 with a significantly higher S4 critical pressure compared to unimodal MDPE - 10 bar compared to 1 bar.

Another measure of RCP resistance is the critical temperature. This is defined as the temperature above which RCP will not occur. Therefore, a gas engineer wants to use a PE material with a critical temperature as low as possible. Although critical temperature is not used as a requirement in the product standards, it is an important parameter, and perhaps should be given more consideration. Following is a table with some typical critical temperature values for various generic PE materials. For most cases, the pipe size tested is 12-inch SDR 11 pipe.

PE Material/Critical Temperature (TC) at 5 bar (75 psig)

Unimodal MDPE 15°C (60°F)
Bimodal MDPE -2°C (28°F)

Unimodal HDPE 9°C (48°F)
Bimodal HDPE -17°C (1°F)

Again, we see that RCP performance for HDPE is slightly better than MDPE, but there is a significant difference between bimodal PE and unimodal PE. The bimodal MDPE and HDPE materials have the lowest critical temperatures, which means the greatest resistance to RCP.

Conclusion

As gas companies use PE pipe in more demanding applications, such as larger pipe diameters and higher operating pressures, the resistance of the PE pipe to rapid crack propagation (RCP) becomes more important. In this article we have discussed the phenomenon of RCP and the two primary test methods used to determine RCP resistance - the S4 test and the Full Scale test. We reviewed the correlation formula between the FS test and S4 test for critical pressure. We have also discussed the two primary results of RCP testing - the critical pressure and the critical temperature.

ISO standards were the first to recognize the importance of RCP, especially in larger diameter pipe sizes, and incorporated RCP requirements in product standards, such as ISO 4437. The Canadian standards soon followed, and an RCP test requirement has been added to CSA B137.4. The required values for RCP testing are being added to the CSA Code of Practice in CSA Z662 Clause 12 for gas piping. ASTM just added an RCP requirement to its gas pipe standard ASTM D 2513. The corresponding AGA PMC project to develop RCP recommendations for required values from RCP testing is in progress.

In this article, we also discussed some results of RCP testing. In general, the HDPE materials have slightly greater RCP resistance than MDPE materials used in the gas industry. A more significant difference is observed when comparing unimodal PE materials to bimodal PE materials. Existing data indicate that bimodal HDPE materials show a significant increase in critical pressure compared to unimodal HDPE materials and also have considerably lower critical temperature values.

In addition, this bimodal technology has now just been introduced for MDPE. This bimodal MDPE material also has a significantly higher S4 critical pressure (10 bar vs. 1 bar) and a lower critical temperature than unimodal MDPE materials. With several PE resin manufacturers being able to produce bimodal PE materials, it is likely that in the near future, all PE materials used for the gas industry will be bimodal materials because of their superior RCP resistance.

Reference:

“Rapid Crack Propagation Increasingly Important in Gas Applications: A Status Report”, Dr. Gene Palermo, http://pipelineandgasjournal.com/rapid-crack-propagation-increasingly-important-gas-applications-status-report, January 2014.

Pipeline Free Span Analysis and Mitigation

Nowadays, offshore pipelines have a significant role in development of oil and gas industry in different parts of the world. This crucial industry is laid on seabed by various methods either embedded in a trench (buried method) or laid on uneven seabed (unburied method). Construction of unburied pipeline is the most common method for its rapid and economic performance. In this method, however, the pipelines are subjected to various lengths of free spanning throughout the route during its life time, which may threaten the pipelines safety. Free spanning in offshore pipelines mainly occurs as a consequence of uneven seabed and local scouring due to flow turbulence and instability; hence, with no doubt, free spanning occurrences for unburied pipelines are completely inevitable.

Fredsoe and Sumer (1997) assessed the role of free spans in unburied offshore pipelines. They acknowledged the previous studies and mentioned that resonance is the main problem for offshore pipelines laid on the free spanning. Pipelines resonance happens when the external load frequency as a result of vortex shedding becomes equal to the pipe Natural Frequency. This phenomenon may burst the pipe coating and may lead to develop more fatigue on the pipelines. Different design guidelines, e.g. DNV (1998) and ABS (2001), have accepted a less stringent approach and recommend the free spanning to be reduced to the allowable length to avoid fatigue damage. These guidelines proposed a simple formulation to calculate the first Natural Frequency based on the pipelines specifications and seabed conditions; however, all of the guidelines encourages using modal analysis at the final phase of design.

Choi (2000) studied the effect of axial forces on free spanning of offshore pipelines. The results indicated that the axial force has a significant influence on the first Natural Frequency of the pipe. In this research, the different seabed condition has been broken down into three main types and the general beam equation for the boundary conditions was analytically solved. He also compared his result with Lloyd’s approximate formula, which estimates the first Natural Frequency of the beam considering axial load effect. Xu et al. (1999) applied the modal analysis to incorporate the real seabed condition to assess pipelines fatigue and Natural Frequency (NF). Later, Bai (2001) approved Xu et al. (1999) approach and emphasis on applying the modal analysis to determine the allowable length of free span for offshore pipelines.

In practice, a considerable amount of works have been applied to determine the allowable free span length, however, there is still lack of knowledge in assessing the role of all effective parameters in determination of allowable free span length. The objective of this paper is two folds: (i) to assess the role of main effective parameters on Natural Frequency; and (ii) to present a simple formula for allowable free span length with accounting for the seabed condition. To do so, first the approaches of DNV (1998) and ABS guidelines are discussed and then the modal analysis is outlined to have a useful tool to assess the role of all involved parameters. Finally, a case study on the Qeshem pipelines is performed to evaluate the free span allowable length.

During pipeline routing evaluation, consideration has to be given to the shortest pipeline length, environment conservation, and smooth sea bottom to avoid excessive free spanning of the pipeline. If the free span cannot be avoided due to rough sea bottom topography, the excessive free span length must be corrected. Free spanning causes problems in both static and dynamic aspects. If the free span length is too long, the pipe will be over-stressed by the weight of the pipe plus its contents. The drag force due to near-bottom current also contributes to the static load.

To mitigate the static span problem, mid-span supports, such as mechanical legs or sand-cement bags/mattresses, can be used. Free spans are also subject to dynamic motions induced by current, which is referred to as a vortex induced vibration (VIV). The vibration starts when the vortex shedding frequency is close to the natural frequency of the pipe span. As the pipe natural frequency is increased, by reducing the span length, the VIV will be diminished and eliminated. Adding VIV suppression devices, such as strakes or hydrofoils, can also prevent the pipe from vibrating under certain conditions. The VIV is an issue even in the deepwater field since there exists severe near-bottom loop currents. To prevent static and dynamic spanning problems, a number of offshore pipeline spanning mitigation methods in Table 3 have been identified. Based on soil conditions, water depth, and span height from the seabed, the appropriate method should be selected. If the span off-bottom height is relatively low, say less than 1 m (3 ft), sand-cement bags or mattresses are recommended. If the span off-bottom height is greater than 1 m (3 ft), clamp-on supports with telescoping legs or auger screw legs are more practical.

References:

Bakhtiary, Abbas Yeganeh, Abbas Ghaheri, Reza Valipour. 2007. “Analysis of Offshore Pipeline Allowable Free Span Length”.

http://www.jylpipeline.com, January 2014.

Pipeline Hot Tap

Hot Taps or Hot Tapping is the ability to safely tie into a pressurized system, by drilling or cutting, while it is on stream and under pressure.

Typical connections consist:

  • Tapping fittings like Weldolet®, Reinforced Branch or Split Tee.
    Split Tees often to be used as branch and main pipe has the same diameters.
  • Isolation Valve like gate or Ball Valve.
  • Hot tapping machine which includes the cutter, and housing.

Mechanical fittings may be used for making hot taps on pipelines and mains provided they are designed for the operating pressure of the pipeline or main, and are suitable for the purpose.

  • Design: ANSI B31.1, B31.3, ANSI B31.4 & B31.8, ASME Sec. VIII Div.1 & 2
  • Fabrication: ASME Sec. VIII Div.1
  • Welding: ASME Sec. IX
  • NDT: ASME Sec. V

There are many reasons to made a Hot Tap. While is preferred to install nozzles during a turnaround, installing a nozzle with equipment in operation is sometimes advantageous, especially if it averts a costly shut down.

Remarks before made a Hot Tap

  • A hot tap shall not be considered a routine procedure, but shall be used only when there is no practical alternative.
  • Hot Taps shall be installed by trained and experienced crews.
  • It should be noted that hot tapping of sour gas lines presents special health and metallurgical concerns and shall be done only to written operating company approved plans.
  • For each hottap shall be ensured that the pipe that is drilled or sawed has sufficient wall thickness, which can be measured with ultrasonic thickness gauges. The existing pipe wall thickness (actual) needs to be at least equal to the required thickness for pressure plus a reasonable thickness allowance for welding. If the actual thickness is barely more than that required for pressure, then loss of containment at the weld pool is a risk.
  • Welding on in-service pipelines requires weld procedure development and qualification, as well as a highly trained workforce to ensure integrity of welds when pipelines are operating at full pressure and under full flow conditions.

Hot Tap fittings

Hot Tap setup

For a hot tap, there are three key components necessary to safely drill into a pipe; the fitting, the Valve, and the hot tap machine. The fitting is attached to the pipe, mostly by welding.
In many cases, the fitting is a Weldolet® where a flange is welded, or a split tee with a flanged outlet (see image above).
Onto this fitting, a Valve is attached, and the hot tap machine is attached to the Valve (see images on the right). For hot taps, new Stud Bolts, gaskets and a new Valve should always be used when that components will become part of the permanent facilities and equipment.
The fitting/Valve combination, is attached to the pipe, and is normally pressure tested. The pressure test is very important, so as to make sure that there are no structural problems with the fitting, and so that there are no leaks in the welds.
The hot tap cutter, is a specialized type of hole saw, with a pilot bit in the middle, mounted inside of a hot tap adapter housing.
The hot tap cutter is attached to a cutter holder, with the pilot bit, and is attached to the working end of the hot tap machine, so that it fits into the inside of the tapping adapter.
The tapping adapter will contain the pressure of the pipe system, while the pipe is being cut, it houses the cutter, and cutter holder, and bolts to the Valve.

Hot Tap operation

The Hot Tap is made in one continuous process, the machine is started, and the cut continues, until the cutter passes through the pipe wall, resulting in the removal of a section of pipe, known as the "coupon".
The coupon is normally retained on one or more u-wires, which are attached to the pilot bit. Once the cutter has cut through the pipe, the hot tap machine is stopped, the cutter is retracted into the hot tap adapter, and the Valve is closed.
Pressure is bled off from the inside of the Tapping Adapter, so that the hot tap machine can be removed from the line. The machine is removed from the line, and the new service is established.

Hot Tap Coupon

The Coupon, is the section of pipe that is removed, to establish service. It is very highly desirable to "retain" the coupon, and remove it from the pipe, and in the vast majority of hot taps, this is the case.
Please note, short of not performing the hot tap, there is no way to absolutely guarantee that the coupon will not be "dropped".
Coupon retention is mostly the "job" of the u-wires. These are wires which run through the pilot bit, and are cut and bent, so that they can fold back against the bit, into a relief area milled into the bit, and then fold out, when the pilot bit has cut through the pipe.
In almost all cases, multiple u-wires are used, to act as insurance against losing the coupon.

Line Stopping

Line Stops, sometimes called Stopples (Stopple® is a trademark of TD Williamson Company) start with a hot tap, but are intended to stop the flow in the pipe.
Line Stops are of necessity, somewhat more complicated than normal hot taps, but they start out in much the same way. A fitting is attached to the pipe, a hot tap is performed as previously detailed. Once the hot tap has been completed, the Valve is closed, then another machine, known as a line stop actuator is installed on the pipe.
The line stop actuator is used to insert a plugging head into the pipe, the most common type being a pivot head mechanism. Line stops are used to replace Valves, fittings and other equipment. Once the job is done, pressure is equalized, and the line stop head is removed.
The Line Stop Fitting has a specially modified flange, which includes a special plug, that allows for removal of the Valve. There are several different designs for these flanges, but they all work pretty much the same, the plug is inserted into the flange through the Valve, it is securely locked in place, with the result that the pressure can be bled off of the housing and Valve, the Valve can then be removed, and the flange blinded off.

Line Stop setup

The Line Stop Setup includes the hot tap machine, plus an additional piece of equipment, a line stop actuator. The Line Stop Actuator can be either mechanical (screw type), or hydraulic, it is used, to place the line stop head into the line, therefore stopping the flow in the line.
The Line Stop Actuator is bolted to a Line Stop Housing, which has to be long enough to include the line stop head (pivot head, or folding head), so that the Line Stop Actuator, and Housing, can be bolted to the line stop Valve.
Line stops often utilize special Valves, called Sandwich Valves.
Line Stops are normally performed through rental Valves, owned by the service company who performs the work, once the work is completed, the fitting will remain on the pipe, but the Valve and all other equipment is removed.

Line Stop operation

A Line Stop starts out the same way as does a Hot Tap, but a larger cutter is used,.
The larger hole in the pipe, allows the line stop head to fit into the pipe.
Once the cut is made, the Valve is closed the hot tap machine is removed from the line, and a line stop actuator is bolted into place.
New gaskets are always to be used for every setup, but "used" studs and nuts are often used, because this operation is a temporary operation, the Valve, machine, and actuator are removed at the end of the job.
New studs, nuts, and gaskets should be used on the final completion, when a blind flange is installed outside of the completion plug.
The line stop actuator is operated, to push the plugging head (line stop head), down, into the pipe, the common pivot head, will pivot in the direction of the flow, and form a stop, thus stopping the flow in the pipe.

Completion Plug

In order to remove the Valve used for line stop operations, a completion plug is set into the line stop fitting flange (Completion Flange).
There are several different types of completion flange/plug sets, but they all operate in basically the same manner, the completion plug and flange are manufactured, so as to allow the flange, to accept and lock into place, a completion plug.
This completion plug is set below the Valve, once set, pressure above the plug can be bled off, and the Valve can then be removed.
Once the plug has been properly positioned, it is locked into place with the lock ring segments, this prevents plug movement, with the o-ring becoming the primary seal.
Several different types of completion plugs have been developed with metal to metal seals, in addition to the o-ring seal.

Line Stopping
Procedure

All following images are from Furmanite.
They are a little matched to the style
of this website requirements.

Line StopLine StopLine StopLine StopLine StopLine Stop
Line StopLine Stop

Line StopLine Stop
Line StopLine Stop
Line StopLine StopLine StopLine Stop
Line Stop

Reference:

“Introduction to Hot Tapping and Line Stopping”. http://www.wermac.org/specials/hottap.html. January 2014.

Soil-Pipeline Interaction Using FEM

Offshore pipelines laid on the seabed are exposed to hydrodynamic and cyclic operational
loading. As a result, they may experience on-bottom instabilities, walking and lateral
buckling. Finite element simulations are required at different stages of the pipeline design to
check the different loading cases. Pipeline design depends on accurately modelling axial and
lateral soil resistances.
 
Conventional pipeline design practice is to model the interaction between the pipe and the
seabed with simple “spring-slider” elements at intervals along the pipe, as finite element
methods with elaborated contact and interface elements between the pipeline and the
foundation do not allow for comprehensive modeling of long pipeline systems with current
computational power (Tian et al, 2008). These “spring-slider” elements provide a bi-linear,
linear-elastic, perfectly plastic response in the axial and lateral directions. The limiting axial
and lateral forces are based on empirical friction models, which relate axial and lateral
resistance to the vertical soil reaction by using a “friction factor”. In the vertical direction, a
non-linear elastic load embedment response derived from bearing capacity theory is usually
assumed, the pipeline being treated as a surface strip foundation of width equal to the chord
length of pipe-soil contact at the assumed embedment.

These simple models can be adequate for sand but are too simplistic for clay, especially soft clay. Due to the slow rate of consolidation of clay, a total stress approach using an undrained
shear strength su should be employed. In this case, the axial and lateral resistances do not directly depend on the vertical soil reaction but on the contact area between the pipe and the
seabed. As a result, an accurate prediction of the pipeline embedment, which can be large in
very soft cay, becomes of primary importance.
 
These simple models were improved to better predict pipeline embedment and axial and
lateral resistances and were implemented in a Finite Element software program for pipeline
analysis to better simulate the pipe-soil interaction of surface laid pipelines in soft clay and to
more accurately simulate full routes. The new features are briefly explained in this paper. A
more recent pipe-soil vertical reaction law that models plastic unloading is built into the
program. It considers lay and dynamic installation effects to compute a more representative
pipeline embedment. Axial and lateral resistance is now linked to pipeline embedment.
Finally, peak-residual axial and lateral reaction laws are implemented.

Vertical reaction law
 
Solutions for estimating the resistance profile have been provided by Murff et al. (1989),
Aubeny et al. (2005) and Randolph & White (2008). The pipeline penetration z may be
estimated from the conventional bearing capacity equation, modified for the curved shape of
a pipeline:

image

where V is the vertical load per unit length, D is the pipeline diameter, su the undrained shear
strength at the pipeline invert and As the nominal submerged area of the pipeline crosssection.
For design, the bearing capacity factor Nc can be estimated using rounded values of
the power law coefficients a and b, for example a = 6 and b = 0.25 (Randolph & White,
2008). Buoyancy has an influence in extremely soft soil conditions. This is captured by the
buoyancy factor Nb. The factor fb should be taken equal to 1.5 because of heave (Randolph
& White, 2008).

The accuracy of this calculation approach, of the order of +/- 10%, is sufficient given the
other uncertainties such as the installation effects, which influence the vertical load V (see
below) (White & Randolph, 2007).

Installation effects
During installation of a pipeline, the vertical and horizontal motion of the lay barge and the
load concentration at pipe touch-down will yield larger penetration than calculated based on
the pipe submerged unit weight. The load concentration can be taken into account by
multiplying the pipe weight by an amplification factor flay as proposed by Bruton (2006). In
order to take into account the effect of pipe motion during installation, a partially remoulded
shear strength can be used to compute the pipe embedment, as proposed by Dendani &
Jaeck (2007), instead of the intact strength. These features combined with the vertical
reaction law described above allow predicting a more realistic pipeline embedment, which is
of primary importance to compute a realistic axial and lateral resistance.

Plastic unloading
A non-linear elastic load embedment response is conventionally assumed for the vertical soil
spring. However, it is essential to model a spring as behaving plastically to avoid predicting
an unrealistic rebound when the pipe is unloaded. In practice, a pipe is often overpenetrated,
meaning that its operating weight is lower than the maximum vertical force that
had been applied to it. In effect, it has been unloaded. It is important to model a spring with
plastic behaviour and “memory” to calculate the appropriate vertical soil stiffness. The
behaviour of an over-penetrated pipe can be described by the stiff unload-reload line. When
reloaded to its normally-penetrated range, the pipe’s behaviour can be described as following
the virgin load embedment curve. This is illustrated in the example below and in Figure 1.
Let us first consider an elastic spring. During installation, the pipe moves to A1 due to load
concentration and then rebounds to A2, to a vertical displacement corresponding to its
submerged empty weight. During the hydrotest, the vertical force increases and the pipe
moves to B. During operational conditions, if the content is lighter than water, the pipe is
unloaded to point C. The pipe embedment and the tangent stiffness at this point are not
realistic. In the case of an elasto-plastic spring, the pipe goes to A1 during installation and
then to A2* following an unload-reload line. During the hydrotest, the vertical force increases
to B* along the unload-reload line. Finally, the pipe is unloaded to C*. At this point, the
pipeline embedment and the tangent stiffness are more realistic. An accurate pipe
embedment is especially important when it is coupled to axial and lateral resistance (see
next Section).

image

Figure 1 – Behaviour of non-Linear Elasto-Plastic Vertical Springs

Coupling of axial and lateral resistance with pipeline embedment
The axial and lateral resistances depend on the contact area between the pipe and the
seabed and thus the pipe embedment, when a total stress approach is followed. The formula
used to compute peak axial and lateral resistances Fpa and Fpl are in the form:

image

where αsu is the unit interface shear resistance, Ac is the area of contact between the pipe
and the seabed which is a function of the pipe embedment z, μ is a “friction factor” in the
range 0.2-0.8 (Randolph & White, 2007) and λ a coefficient typically in the range 0.5-2.
The axial and lateral resistances have been linked to the pipeline embedment so that they
are automatically calculated and can change during the analysis.


Tri-linear axial and lateral model
Models of the simple bi-linear frictional axial and lateral springs were improved so they can
use peak and residual resistances to model the softening of the axial and lateral response
often observed in clay. As explained earlier, pipelines are often over-penetrated in practice.
When this occurs in soft clay, lateral breakout resistance Fpl, is high and drops sharply when
suction at the rear face of the pipe is lost, then decreases further to a residual value Frl as
the pipe rises to a shallower embedment. When the residual resistance is reached, the
lateral resistance may increase again because a soil berm forms in front of the pipe (see
Figure 2). The axial resistance may experience strain softening as well due to suction
release and clay remoulding.

image

Figure 2 – Tri-linear Lateral Resistance Model

Conclusions
Simple soil models conventionally used in pipeline design practice have been improved and
implemented in a Finite Element software program for pipeline analysis. There are several
improvements. A more recent pipe-soil vertical reaction law that models plastic unloading is
built into the program. It considers lay and dynamic installation effects to compute a more
representative pipeline embedment. Axial and lateral resistance is now linked to pipeline
embedment. Finally, peak-residual axial and lateral reaction laws have been implemented.
The new features are basic but important first steps towards more accurate full route
simulations, especially those in soft clay.


References:

Ballard, Jean-Christophe, Hendrik Falepin, Jean-François Wintgens. 2009. “Towards More Advanced Pipe-Soil Interaction Models in Finite Element Pipeline Analysis”. Belgium: Fugro.

Pipeline Bend Computer Simulation

The induction bending process for large-diameter pipes is very popular technology. An important problem in the bending process is prediction and improvement of the bending quality. In this article, a thermo-elastic-plastic mechanical model is used to simulate induction bending of large-diameter pipes. The bending experiments of the API 5L X65 induction bend pipes were performed to clarify the deformation behavior of the pipes. The large deformation behaviors of these experiments were simulated by finite element method, using ADINA software.

sim1

Triple D Bending has been bending pipe for 26 years and induction bending for seven years. Customer specifications and requirements for material properties are becoming increasingly stringent and the company is continually improving processes to meet these requirements. For some customer applications, ovality of the pipe bends is of major concern. For this reason Triple D Bending desired to have a method of predicting the ovality of completed bends in order to find ways to improve the ovality of the pipe bends.

In pipe production, pipe bending using local induction heating is an advanced technique to produce large diameter pipes with a large or small bend radius.

Induction bending as a technique is relatively quick and cheap, but induction bending can produce unwanted changes in geometry such as wall thinning at the extrados, wall thickening and wrinkling at the intrados, and steep transitions in wall thickness between tangent and bend. These problems increase in severity as the bend radius is reduced. However, there are a lot of other problems, such as springback and cross-section ovality when bending thinwall pipe with a large diameter.

  • Pipe diameter ØD = 30-inches (762 mm),
  • Wall thickness t = 0.562 inch (14.27 mm),
  • Material     API 5L X65,
  • Bend radius     R = 189 inches (4800 mm),
  • Bend angle     φ= 90°.

The fundamental tasks which had to be solved can be summarized as follows:

  • material characteristics identification;
  • implementation of material characteristics into computational model;
  • finite element modelling (geometry, definition of thermal contact problem, thermo-plasticity and large strain analysis);
  • FE stress, strain, displacement analysis;
  • computational ovality prediction.

Line pipe for constructing oil and gas pipelines is made from steel, and in particular, either low-carbon steel or low-alloy steel. Low-carbon or low-alloy steels are suitable for line pipe materials and most other steel structures such as buildings or bridges because they provide a durable, strong material to withstand the service loads imposed on such structures. Other iron-based materials such as wrought iron and cast iron are either too low strength or too brittle to function well as structural materials.

Stainless or high-alloy steels are essential for special applications such as in high-temperature piping and pressure vessels or tool steels, but they are not suitable and cannot be made economically in the quantities needed for use in structures including pipelines. Only low-carbon steels or low-alloy steels offer the appropriate ranges of desirable properties (i.e., strength, toughness, ductility and weldability) that are required for structural applications.

The performance of steels depends on the properties associated with their microstructures. Each type of microstructure and product is developed to characteristic property ranges by specific processing routes that control and exploit microstructural changes. Carbon steels and low-alloy steels with ferrite-pearlite or ferrite-bainite microstructures are used extensively at elevated temperatures. Carbon steels are often used up to about 370ºC under continuous loading, but also have allowable stresses defined up to 540ºC. Effect of elevated-temperature exposure on the room-temperature tensile properties of normalized 0.17% C steel after exposure (without stress) to indicated temperature for 83,000 hours is shown in Figure 1.

The allowable design stresses for steels at elevated temperatures may be controlled by different mechanical properties, depending on the application and temperature exposure.

In designing components that are to be produced from low-alloy steels and to be exposed to temperatures up to 370ºC, the yield and ultimate strengths at the maximum service temperature can be used much as they would be used in the design of components for service at room temperature.

During operation, microstructure of experimental steel XH API 5L X65 is exposed to different levels of temperatures, thus we need to account for the influence of temperature on the behavior of this structural steel. Mechanical properties of a structural steel vary with temperature. In material behavior, changes in temperature can cause the following effects: 1) elastic constants (e.g., E, ν) of the material can change; 2) strain can develop without mechanical loading; 3) material yield strength decreases with increase in temperature; and 4) the material can lose ductility with decrease in temperature.

For the material properties, analysis at room and elevated temperatures were selected as the experimental methods – mechanical properties tests (tensile test) and mathematical approximation of statistical data. The results, tensile test at room temperature and other mechanical characteristics are presented in Table 1.

Table 1: Mechanical properties of API 5L X65 at room and elevated (850ºC) temperature.

simtable

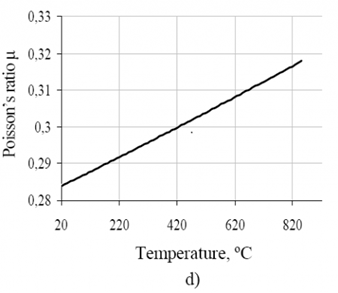
For many structural materials, a change in temperature of a few tens of degrees Celsius from room temperature may not result in much change in the elastic constants. At high enough temperatures, the stiffness and strength of structural steels may be reduced even if the ductility increases. Elevated temperature values of elastic modulus can be determined during tensile testing or dynamic testing. Figure 2 a) shows values of elastic modulus API 5L X65 between room temperature and elevated temperature. The influence of elevated temperature on Yield strength, Ultimate tensile strength and Poisson’s ratio are shown in Figure 2 a) to Figure 2 d). These results were determined during static tensile loading and the statistical data obtained using mathematical approximation.

sim2sim2-2sim2-3sim2-4

Figure 2 a), b), c), d): Effect of elevated temperature on mechanical characteristic API 5L X65.

Final values of mechanical parameters at the temperature of 850ºC were obtained from extrapolated curve lines shown in Figure 3, where: σ is engineering stress, ε is engineering strain, E is modulus of elasticity or Young’s modulus at room temperature, E850ºC is modulus of elasticity or Young’s modulus at elevated temperature, H is isotropic hardening modulus at room temperature, and H850ºC is isotropic hardening modulus at elevated temperature. These values were used as input parameters for the FEM analysis of bending process.

sim3

Figure 3: Schematic view of temperature dependent material bilinear model.

Computational Assumptions
The finite element method was used for modeling the process of induction bending (Figure 4). The computational model contains the following assumptions:

  • The model is built as a half model satisfying symmetrical, boundary and initial conditions.
  • They are considered large displacements and large strains (enable to model the shape changes and plasticity during calculation).
  • A temperature dependent material bilinear model is needed (Figure 3).
  • Induction heating is substitute by heat transfer in contact between bodies (in inductor position, bodies which come into contact by pipe have temperature equal 850˚C, occur heating of pipe material). Contact is modeled without friction and contact pressure is considered 1 MPa.
  • Water cooling system is substitute by heat transfer in contact between bodies (in water cooling system position, bodies which come into contact by pipe have temperature equal 20˚C, occur cooling of pipe material). Contact is modeled without friction and contact pressure is 1 MPa.
  • Guiding devices are substitute by tight contact surface which come into contact with pipe during simulation, contact is modelled without friction.
  • The movement of the pipe is imposed in the free end by velocity equal 0.0018 m s-1.
  • The solution time is 18,720 seconds and corresponds to bending of pipe about 90˚.
  • Pipe diameter is 762 mm, wall thickness is 14.27 mm and bending radius is 4,800 mm.

sim4

Figure 4: Finite element model of induction bending process.

Necessary inputs for modeling of technological process of the induction bending of pipes:

  • accurate geometrical characteristics of device (inductor position, water cooling system position, pipe diameter, wall thickness, bending radius, guiding device position, displacement velocity, initial temperature of pipe);
  • material characteristics (Young’s modulus, Poisson’s ratio, Yield strength, isotropic hardening modulus, coefficient of thermal expansion) for temperature range 20 - 850˚C.

Finite Element Modeling Process
The modeling process is realized by using the “classic” finite element computational approach. The Grab mechanism is substituted by a set of solid elements inside the pipe. The bending arm is modeled as two rigid truss elements (Figure 4). These trusses are connected to pin (center of the bending) and solid elements substitute for the grab mechanism. There is in the pin no degree of freedom. In this manner, the bending arm, grab mechanism and pipe may freely rotate around the pin. The grab mechanism is modelled as one layer of solid elements inside the pipe. Low number of elements is used to simulate the bending arm and the grab mechanism, reducing bandwidth of the stiffness matrix [2,6].

The induction bending process is characterized by energy lost from the material surface to the environment. Conduction, convection and radiation cause non-constant temperature distribution across the pipe wall. In order to determine the temperature difference between the outer and inner wall surfaces a thermal FE analysis was performed. There are two thermal boundary conditions applied. First is boundary convection, second is boundary radiation. These boundary conditions are applied on the inner and outer face of the pipe. Application of these boundary conditions and heating mechanism causes the temperature gradient from the outer to the inner face of the pipe. These differences of surface temperatures are low and therefore it can be neglected.

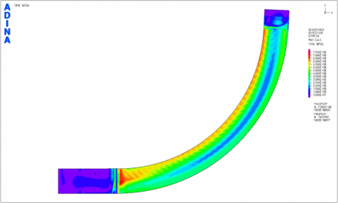
The chosen results of the computational simulation are presented in Figure 5 and Figure 6. Ovalization of the pipe cross-section shall be limited in design to prevent section collapse. The pipe diameter changes are evaluated in two directions: first is in the radial direction, second is in the binormal direction. These changes of diameters are dependent on the angle of the bending arm (Figure 7). The pipe was 30-inch/762 mm - API 5L X65. The applied bending angle was taken from range 0 to 90 degrees. Bend radius was 4800 mm and wall thickness was 0.562 inch / 14.27 mm.

sim5

Figure 5. Distribution of plastic strains (plastic deformation).

sim6

Figure 6: Von Mises stress distribution after bending process.

sim7

Figure 7. Ovality behavior measured during induction bending test realized by computational finite element analysis.

Conclusion
This article presents finite element analysis of the complicated technological problem. The results of the analysis provide information about shape (diameter) changes of the bending pipe. The computational process complicates temperature dependence of the material characteristics and the substitution of induction heating.

Induction heating is a physically complex action. Modeling of this process is not included in FEM software for such structural problems. For this reason it is necessary to substitute induction heating by contact between bodies with heat transfer. Using this substitution simplifies the whole FE model; on the other hand, this solution has the right accuracy.

The main goal of this material has been to present the possibilities of the finite element analysis in the induction bending process of large-diameter pipes. The results of the introduced simulation approach can be summarized as follows: 1) analysis of the residual stress, strain and displacement distribution in pipe; 2) analysis of the plastic stress, strain and displacement distribution in pipe; 3) analysis of the temperature distribution; and 4) analysis of the pipe shape modification – ovality modification.


References: “Computer Simulation of Induction Bending Process”. http://pipelineandgasjournal.com/computer-simulation-induction-bending-process. January 2014.

Sunday, 26 January 2014

Horizontal Directional Drilling (HDD)

For many decades the only way we could extract natural gas was to drill a well straight down into the ground. However, in many instances, this is not possible, not economically feasible, or simply not efficient. Technological advances now allow us to efficiently deviate from 'straight line' drilling, and steer the drilling equipment to reach a point that is not directly underneath the point of entry. While what is known as 'slant drilling', where the well is drilled at an angle instead of directly vertical, has been around for years, new technology is allowing for the drilling of tightly curved well holes, and even wells that can take a 90 degree turn underground.

directional_drill_site

Directional drilling is the process of drilling a curved well, in order to reach a target that is not directly beneath the drill site. This is useful in many circumstances where the area above the targeted deposit is inaccessible. For example, to reach reservoirs that exist under shallow lakes, protected areas, railroads, or any other area on which the rig cannot be set up, directional drilling is employed. It is also useful for long, thin reservoirs. These types of reservoirs are not efficiently mined with a vertical completion. However, horizontal entry into the reservoir allows it to be drained more efficiently. Directional drilling is especially useful for offshore locations. The cost of offshore drilling rigs can make it uneconomical to drill a single well. With directional drilling, the offshore rig can gain access to deposits that are not directly beneath the rig, meaning that 20 or more wells can be drilled from a single rig, making it much more cost effective to drill offshore.

Horizontal Drilling

The difference between traditional directional or slant drilling and modern day horizontal drilling, is that with directional drilling it can take up to 2,000 feet for the well to bend from drilling at a vertical to drilling horizontally. Modern horizontal drilling, however, can make a 90 degree turn in only a few feet! The concept of horizontal drilling is not new. In fact, the first patent for horizontal drilling was issued in 1891 to Robert E. Lee, for drilling a horizontal drainhole for a vertical well. The advances in technology and the increasing focus on accessing less accessible reservoirs to meet rising demand have allowed for a proliferation of horizontal drilling.

Horizontal drilling technologies have been heralded by many as the greatest advances since the conception of the rotary drilling bit. Horizontal drilling now accounts for 5 to 8 percent of active onshore wells in the U.S., and seems to be increasing every year. The ability of horizontal drilling to reach and extract petroleum from formations that are not accessible with vertical drilling has made it an invaluable technology. Horizontal drilling allows for an increase in the recoverable petroleum in a given formation, and even increases the production in fields previously thought of as marginal or mature. Horizontal drilling also allows for more economical drilling, and less impact on environmentally sensitive areas. In fact, in some areas in which drilling is not allowed for environmental reasons, it is possible to drill horizontal wells to the targeted deposit without harming the environment above. In addition, with this technology, fewer wells are needed to produce the same amount of hydrocarbons.

slant_and_horizontal_drill_diagram

A number of advances were crucial to the progression of horizontal drilling. Measurement-while-drilling technology (or 'borehole telemetry') has allowed engineers and geologists to gain up-to-the-minute subsurface information, even while the well is being drilled. This avoids some of the complications of normal logging practices, and greatly increases the drilling engineer's knowledge of the well characteristics. Steerable downhole motor assemblies have also allowed for advances in horizontal drilling. While conventional drilling occasionally employs the use of downhole motors just above the drill bit to penetrate hard formations, steerable drilling motors allow the actual path of the well to be controlled while drilling.

There are three main types of horizontal wells; short-radius, medium-radius, and long-radius. Short-radius wells typically have a curvature radius of 20 to 45 feet, being the 'sharpest turning' of the three types. These wells, which can be easily dug outwards from a previously drilled vertical well, are ideal for increasing the recovery of natural gas or oil from an already developed well. They can also be used to drill non-conventional formations, including coalbed methane and tight sand reservoirs.

Medium-radius wells typically have a curvature radius of 300 to 700 feet, with the horizontal portion of the well measuring up to 3,500 feet. These wells are useful when the drilling target is a long distance away from the drillsite, or where reservoirs are spaced apart underground. Multiple completions may be used to gain access to numerous deposits at the same time.

Long-radius wells typically have a curvature radius of 1,000 to 4,500 feet, and can extend a great distance horizontally. These wells are typically used to reach deposits offshore, where it is economical to drill outwards from a single platform to reach reservoirs inaccessible with vertical drilling.

To give an idea of the effectiveness of horizontal drilling, the U.S. Department of Energy indicates that using horizontal drilling can lead to an increase in reserves in place by 2% of the original oil in place. The production ratio for horizontal wells versus vertical wells is 3.2 to 1, while the cost ratio of horizontal versus vertical wells is only 2 to 1. In carbonate formations, where 90 percent of horizontal drilling is done, productivity of horizontal wells is almost 400 percent higher than vertical wells, while they cost only 80 percent more.

Horizontal drilling is an important innovation that will likely find countless new applications as the technology is developed. With increasing demand for natural gas, innovations like these will be invaluable to securing and bringing to surface these much needed hydrocarbons.

Reference: “Directional and Horizontal Drilling”. http://www.naturalgas.org/naturalgas/extraction_directional.asp. January 2014.

Pipeline Corrosion in GoM

Originally written by: J. S. Mandke, Southwest Research Institute, San Antonio.

Corrosion is the leading cause of failures of subsea pipelines in the U.S. Gulf of Mexico. Third-party incidents, storms, and mud slides are additional principal causes of offshore pipeline failures. These are among the major conclusions of an analysis of 20-year pipeline-failure data compiled by the U.S. Minerals Management Service. For small size lines, additionally, failures due to external corrosion were more frequent during the period studied than internal corrosion. In medium and large-size lines, failures due to internal corrosion were more frequent than those due to external corrosion. Also, the majority of corrosion failures occurred on or near the platform and among the small-size pipelines. The motivation for the study described here was to perform a more in-depth evaluation of the pipeline failure data for the Gulf of Mexico than reported earlier, using an extended data base for the period 1967-87, and to compare the results with those reported earlier. The study results presented here provide an improved basis for assessment of safety of pipelines and for further improvements to current pipeline design, inspection, maintenance, and construction procedures.


Failure Data Analysis

The significant components of a typical offshore pipeline system transporting hydrocarbons are: Platform risers, expansion loops or thermal offsets, subsea valves and fittings, tie-in spools, and the main trunk line or the infield flow line. An understanding of the varying risks of damage and their consequences associated with these components can be developed from an evaluation of the historical data on the reported pipeline failures.

Failure data on offshore pipelines are not readily available for all regions of the world. Most of the reported information is on the pipelines in the Gulf of Mexico and the North Sea. In the U.S., the Department of Interior's MMS has kept a record of offshore pipeline failures since 1967. No other data source with comparable details is available in the public domain on failures of offshore pipelines. Failure data published by the MMS' for about 690 failures that occurred during 1967-87 was compiled into a personal-computer data base.

Although the MMS data on pipeline failures are the most comprehensive source of information available, the information for some of the failures reported is either insufficient or unclear. In those instances, some judgment and assumptions had to be exercised during compilation of these data. This did not affect the actual results, however, because the emphasis of this study has been on detecting the overall failure trends for offshore pipelines rather than the absolute numbers on failures.


Pipeline Failure Causes in GoM

  • Material failures. Material failures include instances where the pipe material ruptured or the weld cracked and failed. Equipment failures were primarily due to leakages or malfunctioning of fittings such as flanges, clamps, valves, etc. Out of the 60 total failures that were grouped under this category, about 23% were attributed to material failure, and the remaining 77% were attributed to equipment failure.
  • Operational problems. Only seven failures were attributed to operational problems. These were mostly the result of lines being overpressured either during the normal operation or the pigging operation.
  • Corrosion failures. Three subcategories comprise corrosion failures. In the first two cases, the failure was clearly identified as the result of either internal or external corrosion. In the third case, the origin of the corrosion was not clearly identified. We will refer to this as general corrosion. Out of the 343 total cases of corrosion failures, 15% resulted from internal corrosion, 46% from external corrosion, and 39% from general corrosion. Further evaluation of these data showed that for the smaller-sized pipe, external corrosion failures were more common, whereas for medium and larger-sized pipe internal corrosion was more common. This latter observation is consistent with the observation made by Andersen and Misund. About 78% of the total corrosion failures occurred on the platform, in the riser section or its vicinity on the seabed, and 20% occurred on pipelines on the seabed away from the platform.
  • Storms, mud slides.

The analysis of the failure data presented here has indicated significant trends in pipeline failures. It is customary to convert the failure data to probability of failure or the failure rate per km-year or mile-year of the pipeline. Because the appropriate actuarial details on these failures were not available, probabilistic analysis of the failure data could not be performed. Corrosion is the leading cause of pipeline failures. It is followed by third-party incidents and storms and mud slides as the other principal causes of offshore pipeline failures in the Gulf of Mexico.

References: “Corrosion Causes Most Pipeline Failures in Gulf of Mexico”. http://www.ogj.com/articles/print/volume-88/issue-44/in-this-issue/pipeline/corrosion-causes-most-pipeline-failures-in-gulf-of-mexico.html. January 2014.