Saturday, 1 February 2014

Underwater Welding

The fact that electric arc could operate was known for over a 100 years. The first ever underwater welding was carried out by British Admiralty – Dockyard for sealing leaking ship rivets below the water line. Underwater welding is an important tool for underwater fabrication works. In 1946, special waterproof electrodes were developed in Holland by ‘Van der Willingen’. In recent years the number of offshore structures including oil drilling rigs, pipelines, platforms are being installed significantly. Some of these structures will experience failures of its elements during normal usage and during unpredicted occurrences like storms, collisions. Any repair method will require the use of underwater welding.

image

Classification

Underwater welding can be classified as
1) Wet Welding
2) Dry Welding
 
In wet welding the welding is performed underwater, directly exposed to the wet environment. In dry welding, a dry chamber is created near the area to be welded and the welder does the job by staying inside the chamber.

WET WELDING
Wet Welding indicates that welding is performed underwater, directly exposed to the wet environment. A special electrode is used and welding is carried out manually just as one does in open air welding. The increased freedom of movement makes wet welding the most effective, efficient and economical method. Welding power supply is located on the surface with connection to the diver/welder via cables and hoses.

In wet welding MMA (manual metal arc welding) is used.
Power Supply used : DC
Polarity : -ve polarity
When DC is used with +ve polarity, electrolysis will take place and cause rapid deterioration of any metallic components in the electrode holder. For wet welding AC is not used on account of electrical safety and difficulty in maintaining an arc underwater.
image

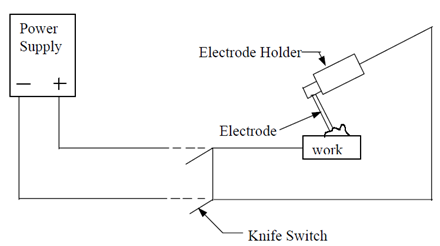
The power source should be a direct current machine rated at 300 or 400 amperes. Motor generator welding machines are most often used for underwater welding in the wet. The welding machine frame must be grounded to the ship. The welding circuit must include a positive type of switch, usually a knife switch operated on the surface and commanded by the welder-diver. The knife switch in the electrode circuit must be capable of breaking the full welding current and is used for safety reasons. The welding power should be connected to the electrode holder only during welding.
Direct current with electrode negative (straight polarity) is used. Special welding electrode holders with extra insulation against the water are used. The underwater welding electrode holder utilizes a twist type head for gripping the electrode. It accommodates two sizes of electrodes.
The electrode types used conform to AWS E6013 classification. The electrodes must be waterproofed. All connections must be thoroughly insulated so that the water cannot come in contact with the metal parts. If the insulation does leak, seawater will come in contact with the metal conductor and part of the current will leak away and will not be available at the arc. In addition, there will be rapid deterioration of the copper cable at the point of the leak.

Hyperbaric Welding (dry welding)
Hyperbaric welding is carried out in chamber sealed around the structure o be welded. The chamber is filled with a gas (commonly helium containing 0.5 bar of oxygen) at the prevailing pressure. The habitat is sealed onto the pipeline and filled with a breathable mixture of helium and oxygen, at or slightly above the ambient pressure at which the welding is to take place. This method produces high-quality weld joints that meet X-ray and code requirements. The gas tungsten arc welding process is employed for this process. The area under the floor of the Habitat is open to water. Thus the welding is done in the dry but at the hydrostatic pressure of the sea water surrounding the Habitat.

Risk Involved

There is a risk to the welder/diver of electric shock. Precautions include achieving adequate electrical insulation of the welding equipment, shutting off the electricity supply immediately the arc is extinguished, and limiting the open-circuit voltage of MMA (SMA) welding sets. Secondly, hydrogen and oxygen are produced by the arc in wet welding.
Precautions must be taken to avoid the build-up of pockets of gas, which are potentially explosive. The other main area of risk is to the life or health of the welder/diver from nitrogen introduced into the blood steam during exposure to air at increased pressure. Precautions include the provision of an emergency air or gas supply, stand-by divers, and decompression chambers to avoid nitrogen narcosis following rapid surfacing after saturation diving.
For the structures being welded by wet underwater welding, inspection following welding may be more difficult than for welds deposited in air. Assuring the integrity of such underwater welds may be more difficult, and there is a risk that defects may remain undetected.

Advantages and Disadvantages of Wet Welding

Advantages

Wet underwater MMA welding has now been widely used for many years in the repair of offshore platforms. The benefits of wet welding are: -
1) The versatility and low cost of wet welding makes this method highly desirable.
2) Other benefits include the speed. With which the operation is carried out.
3) It is less costly compared to dry welding.
4) The welder can reach portions of offshore structures that could not be welded using other methods.
5) No enclosures are needed and no time is lost building. Readily available standard welding machine and equipments are used. The equipment needed for mobilization of a wet welded job is minimal.

Disadvantages

Although wet welding is widely used for underwater fabrication works, it suffers from the following drawbacks: -
1) There is rapid quenching of the weld metal by the surrounding water. Although quenching increases the tensile strength of the weld, it decreases the ductility and impact strength of the weldment and increases porosity and hardness.
2) Hydrogen Embrittlement – Large amount of hydrogen is present in the weld region, resulting from the dissociation of the water vapour in the arc region. The H2 dissolves in the Heat Affected Zone (HAZ) and the weld metal, which causes Embrittlement, cracks and microscopic fissures. Cracks can grow and may result in catastrophic failure of the structure.
3) Another disadvantage is poor visibility. The welder some times is not able to weld properly.

Advantages and Disadvantages of Dry Welding

Advantages

1) Welder/Diver Safety – Welding is performed in a chamber, immune to ocean currents and marine animals. The warm, dry habitat is well illuminated and has its own environmental control system (ECS).
2) Good Quality Welds – This method has ability to produce welds of quality comparable to open air welds because water is no longer present to quench the weld and H2 level is much lower than wet welds.
3) Surface Monitoring – Joint preparation, pipe alignment, NDT inspection, etc. are monitored visually.
4) Non-Destructive Testing (NDT) – NDT is also facilitated by the dry habitat environment.

Disadvantages

1) The habitat welding requires large quantities of complex equipment and much support equipment on the surface. The chamber is extremely complex.
2) Cost of habitat welding is extremely high and increases with depth. Work depth has an effect on habitat welding. At greater depths, the arc constricts and corresponding higher voltages are required. The process is costly – a $ 80000 charge for a single weld job. One cannot use the same chamber for another job, if it is a different one.

Principle of operation of Wet Welding
The process of underwater wet welding takes in the following manner:
The work to be welded is connected to one side of an electric circuit, and a metal electrode to the other side. These two parts of the circuit are brought together, and then separated slightly. The electric current jumps the gap and causes a sustained spark (arc), which melts the bare metal, forming a weld pool. At the same time, the tip of electrode melts, and metal droplets are projected into the weld pool. During this operation, the flux covering the electrode melts to provide a shielding gas, which is used to stabilize the arc column and shield the transfer metal. The arc burns in a cavity formed inside the flux covering, which is designed to burn slower than the metal barrel of the electrode.

Developments in Under Water Welding
Wet welding has been used as an underwater welding technique for a long time and is still being used. With recent acceleration in the construction of offshore structures underwater welding has assumed increased importance. This has led to the development of alternative welding methods like friction welding, explosive welding, and stud welding. Sufficient literature is not available of these processes.

Scope for further developments
Wet MMA is still being used for underwater repairs, but the quality of wet welds is poor and are prone to hydrogen cracking. Dry Hyperbaric welds are better in quality than wet welds. Present trend is towards automation. THOR – 1 (TIG Hyperbaric Orbital Robot) is developed where diver performs pipefitting, installs the trac and orbital head on the pipe and the rest process is automated.
Developments of diverless Hyperbaric welding system is an even greater challenge calling for annexe developments like pipe preparation and aligning, automatic electrode and wire reel changing functions, using a robot arm installed. This is in testing stage in deep waters. Explosive and friction welding are also to be tested in deep waters.


Reference:

Joshi, Amit Mukund. –. “Underwater Welding”. Bombay: Indian Institute of Technology. Link: http://www.metalwebnews.com/howto/underwater-welding/underwater-welding.pdf

Deepwater Pipeline Installation

Asle Venas
DNV

Since the 1970s, offshore oil and gas development has gradually proceeded from shallow-water installations up to around 400 m (1,312 ft) to the ultra-deep waters around 3,000 m (9,842 ft) that represent the maximum today. The question is whether the curve will flatten at 3,000 m, or if this is just a temporary pause on the way to even greater depths. There have been plans for a gas trunkline from Oman to India at 3,500 m (11,483 ft) depth, but it is yet to be seen if there will be many such projects in the near future.


Pipe wall thickness

The main design challenge for development beyond 3,000 m is related to the high external pressure that may cause collapse of the pipeline. From depths of 900 m (2,953 ft) onwards, external over-pressure is normally the most critical failure mode for pipelines. The risk of collapse is typically most critical during installation when the pipe is empty and external over-pressure is at its maximum.

Many of the world's offshore pipelines are designed and constructed to DNV's pipeline standard DNV-OS-F101, and new concepts such as pipe-in-pipe may easily be accounted for by adjusting the relevant failure modes. (Photo courtesy DNV)

Many of the world's offshore pipelines are designed and constructed to DNV's pipeline standard DNV-OS-F101, and new concepts such as pipe-in-pipe may easily be accounted for by adjusting the relevant failure modes. (Photo courtesy DNV)

In addition, the pipe will be exposed to large bending deformation in the sag bend during installation that may trigger collapse, and collapse may also be relevant for operational pipelines subject to significant corrosion.

The main manufacturing processes relevant for larger-diameter, heavy-wall line pipes are UO shaped, welded and expanded/compressed (UOE/C, JCOE) and three roll bending. These processes provide a combination of excellent mechanical properties, weldability, dimensional tolerances, high production capacities and relatively low costs compared to seamless pipes.

There are at least six pipe mills that regularly supply heavy-wall, welded line pipe for offshore projects based on the UOE process: Tata Steel, Europipe, JFE, Nippon Steel, Sumitomo, and Tenaris. Research into further improving manufacturing techniques continues in the industry, and we also see several "newcomers" that can produce good quality pipes for deepwater.

This potential failure mode is normally dealt with by increasing the pipe wall thickness. But at ultra-deepwater depths, this may require a very thick walled pipe that becomes costly, difficult to manufacture, and hard to install due to its weight. Currently, there is a practical limit on wall thickness that limits the maximum water depth for 42-in. pipes to around 2,000 m (6,562 ft) while for a 24-in. pipe, this limit is approximately doubled to 4,000 m (13,123 ft).

Three factors have a major influence on the final compressive strength of the pipeline: quality of plate feedstock, optimization of compression and expansion during pipe forming, and light heat treatment. By focusing on these factors together with improving the ovality of the final pipe, it is possible to obtain a collapse resistance comparable to that of seamless pipes.


X-Stream

X-Stream is a novel pipeline concept developed by DNV that aims to solve the collapse challenge by limiting and controlling the external over-pressure. In a typical scenario, the pipeline is installed partially water-filled, and is thus pressurized at large water depths. Then, to ensure that the internal pressure does not drop below a certain limit during the operational phase when it is filled with gas, it is equipped with a so-called inverse HIPPS (i-HIPPS).

This system also includes some inverse double-block-and-bleed (i-DBB) valves. It is inverse in the sense that instead of bleeding off any leakage to avoid pressure build up in standard DBB systems, any leakage and loss of pressure is avoided by a pressurized void between the double blocks. This is needed to avoid unintended depressurization by a leaking valve which may not be 100% pressure tight when the pipeline system is shut down. Studies undertaken during the development of X-Stream show that the weight increase due to flooding is more or less balanced by the reduction in steel weight.

X-Stream is still at the concept development stage. Some practical aspects need to be studied, such as how to install large valves in ultra- deepwater. Another aspect is repair procedures and equipment, even though that should not be much different from normal ultra-deepwater pipelines. There are also some optimizations to be performed with respect to pressure loss during operation and equalization of the pressure during shutdown.

However, the potential benefits of the X-Stream concept to gas export and trunk lines at ultra-deep waters are quite significant, such as:

  • Reduced steel quantity and associated costs
  • Use of standard pipe dimensions, even for ultra-deepwater and large diameters, reduces line pipe costs
  • No need for buckle arrestors
  • No need for reserve tension capacity in case of accidental flooding.

In addition, a rough cost comparison indicates a 10-30% cost reduction (steel cost, transportation cost, welding cost) compared with a traditional gas trunk line.


Installation methods

There are three main methods used to install offshore pipelines: reeling, S-lay, and J-Lay. In ultra-deep waters, the combined loading of axial force, bending, and external over-pressure during installation can also be critical to wall thickness design. A significant external over-pressure in ultra-deep waters sets up both a compressive longitudinal stress and a compressive hoop stress. Both tend to trigger local buckling at less bending compared to a pipe without the external over-pressure.

A common challenge for all installation methods when it comes to deep and ultra-deep waters is the tension capacity. The catenary length before the pipeline rests at the seabed can become quite long, due to the water depth. The pipe needs to be very thick walled to have the necessary collapse capacity; and thus the submerged weight can become high. It is also often required that the installation vessel be capable of holding the pipe in case of accidental flooding (e.g. a wet buckle). However, it is still a topic of discussion whether it is absolutely necessary to be able to hold an accidentally flooded pipe.

The tension capacity of current vessels limits the water depth for 18 to 24-in. pipelines to around 3,000 m, when not accounting for the accidental flooding case. The limit for 30-in. pipelines is around 2,100 to 2,500 m (6,890 to 8,202 ft). New vessels with a tension capacity of 2,000 metric tons (2,204 tons) will be able to install up to 24-in. or maybe 26-in. pipes at 4,000 m (13,123 ft) water depth, while for 42-in. pipelines the maximum depth will be around 2,500 m (8,202 ft).

Another challenge related to deepwater installation is how to detect buckles during installation. Normally, a gauge plate is pulled through the pipeline by a wire at a certain distance behind the touchdown point. In case of a buckle, the wire pulling force will increase to indicate that something is wrong. However, in ultra-deep waters, the length of the wire and the friction between the wire and the curved pipeline may give challenges in detecting minor buckles. Having a long wire and buckle detector inside a pipeline during installation can also be risky. If the pipeline is lost, the water will push the wire and gauge plate inside the pipeline and it may not be possible to get it out again.


Suspended installation

The Ormen Lange field is located in a pre-historic slide area, with an uneven seabed at nearly 900 m (2,953 ft) water depth. In its early development phase, a submerged, floating pipeline concept was studied to overcome the challenging seabed conditions. By mooring the buoyant pipeline to the seabed, no seabed intervention work would be required. The concept was left for the benefit of a more traditional concept with the pipeline on the seabed mainly because of the challenges with interference between trawl gear and the mooring lines, but it is still considered feasible both with respect to installation and operation.

Another floating pipeline concept has been developed by Single Buoy Moorings. Here the buoyancy is ensured by a large-diameter carrier pipe to which the smaller pipelines are attached. Buoyancy modules, clump weights, and the end anchoring system ensure tension in the pipeline bundle. A short bundle connecting the FPSO and the spar has been installed at Kikeh offshore Malaysia. However, the maximum length of this concept can be extended by use of intermediate vertical supports. Potential challenges will be hydrodynamic forces, both the steady-state drag and the cyclic ones, including vortex-induced vibrations. The challenge is to balance the need for anchoring with the need for flexibility to absorb the forces. (e.g., by making the attachment to the mooring lines in such a way that it does not cause too concentrated bending deformations).


Spiral installation

A future solution for ultra-deep and topologically challenging locations may be to further develop the SpiralLay method developed by Eurospiraal. In this application, the line pipes are joined onshore and wound into a spiral for towing offshore. The spiral can take a quite long length of pipeline which makes it possible to pressurize it. On location, the pipeline is un-wound and installed in a short time. The concept involves installing a pressurized pipeline from a submerged spiral floating at a safe distance above the seabed, thus avoiding the challenges with the combined loading in the sag bend at deep and ultra-deepwater depths. This is a novel concept and needs further development and testing.


Seabed intervention

Seabed intervention and tie-in become more challenging with increasing water depth. Some of the equipment, such as fall pipes for rock installation vessels, have practical limitations (e.g. the maximum length of the fall pipe). The same is the case with ROVs and other equipment needed for installation. Some repair methods - such as retrieving a damaged part to the surface or using subsea welding with divers - are limited by water depth, and can only be used in 200 to 400-m (656 to 1,132-ft) waters. For deepwater, repair methods based on remotely controlled equipment are needed.

Recently developed repair methods for deepwater are based on different types of clamps that are fitted over a locally damaged area; or involve cutting and replacing a section with use of end flanges/couplings and spool pieces. In cases with extreme or comprehensive damage, a new pipeline section may be installed. Typically, both the clamps and the end couplings need to be sealed with grouting or metallic seals. Examples are the Oceaneering systems based on Smart Flange/Connector/Clamp and the Chevron deepwater repair system. These are under development, and designed to operate down to 3,000 m water depths. The Statoil-led PRS consortium is also developing a repair system for deepwater based on remotely welded sleeves. This system is based on two lifting frames, cutting the damaged part, then installing some couplings and a new spool piece.


Notation fosters innovation

Today, 65% of the world's offshore pipelines are designed and constructed to DNV's pipeline standard DNV-OS-F101. It is the only internationally recognized offshore pipeline standard that complies with the ISO codes. The ISO pipeline standard itself, the ISO-13623, is more like a goal setting standard with basically one hoop stress criterion and one equivalent stress criterion, and with little guidance for engineers on how to actually design a pipeline. Here, DNV-OS-F101 has found its niche, giving more detailed requirements in compliance with ISO-13623.

Another reason for the standard's success is that it is based on the so-called limit state design, where all potential failure modes have to be checked according to specific design criteria with given safety factors. This makes it easy to apply the code to novel designs and outside the typical application range (e.g. in deep and ultra-deep waters, in Arctic environments).

The collapse capacity and the fabrication factor for UOE line pipes may be taken as a good example of the flexibility of the DNV-OS-F101 code. The code contains a clause allowing for upgrading the fabrication factor due to different aspects such as light heat treatment and/or compression, instead of expansion at the end of the manufacturing process. The code is also quite transparent in the way the design criterion is written in order to facilitate and take into account innovation and improvements in the fabrication process. Similarly, new concepts such as the X-stream or various pipe-in-pipe concepts may easily be accounted for by adjusting the relevant failure modes, and adding new ones if relevant.

The most likely deep and ultra-deep potential field development areas known today are Gulf of Mexico, the Brazilian presalt areas, and East and West Africa. All pose challenges that could benefit from technology development and innovation.

Reference: “New installation methods may facilitate ultra-deepwater pipelay” ,http://www.offshore-mag.com/articles/print/volume-73/issue-8/flowlines-and-pipelines/new-installation-methods-may-facilitate-ultra-deepwater-pipelay.html, August 2013.

Tuesday, 28 January 2014

Pipe-in-Pipe New Design

Increasing demand for energy, matched with high commodity prices and advances in technology, are driving operators to extract whatever reserves remain in the challenging UK continental shelf. Therefore, the requirement to transfer these multi-phase products from often high-pressure/high-temperature (HP/HT) wells back onshore is an even more demanding prospect.

Up until now, the common belief in the industry was that pipe-in-pipe systems able to withstand environmental challenges such as corrosion, structural integrity, and thermal management, would be too costly and complex to apply to riser systems.

Tata Steel worked closely with supply partners to engineer, procure, and construct these assemblies to further develop this innovative technology as a cost-effective solution to flow assurance issues.

Need for insulation

HP/HT fields are technically more complex to develop because of the inherently higher energy in the well fluid and its multi-phase composition. Managing the extreme pressure and operating temperature must be based and evaluated on criteria such as corrosion, maintaining structural integrity, and thermal management.

One particular challenge is the management of pipeline shutdown. Less expensive solutions for managing the insulation of bends such as wet coatings, compromise overall shutdown times due to reduced thermal efficiency. Solutions, such as "self-draining" spools, present a significant design challenge that can be mitigated by the inclusion of pipe-in-pipe bends, enabling the same thermal integrity to be maintained in the whole line.

Tata Steel has previously implemented a solution for pipe-in-pipe bends for a North Sea development. Since then, new insulation techniques have been developed that give far superior insulation properties.

Risers, spools, and bends

The main challenge with the construction of pipe-in-pipe bends is how to pass the inner flowline bend into the outer casing pipe. It is important that pipe bends have a straight portion on the end to enable efficient welding to the next pipe section and this can present the insertion of one bend into the other.

The second construction challenge is efficient insulation. Wrapping or sheathing is simply not practical here as the insulation would occupy the annulus of the assembly and prevent the integration.

New insulation system

Drawing of the geometry of one pipe into another.

Drawing of the geometry of one pipe into another.

The system developed by Tata Steel overcomes these problems by deploying granular Nanogel insulation into the annulus of the pipe-in-pipe system. Nanogel is made by first forming a silica gel, then expelling the water from the silica matrix. The resulting material is granular with trapped nanopores of air, inhibiting heat transfer by conduction, convection, and radiation (with the inclusion of an opacifier).

The deployment of a novel polymeric bulkhead, cast directly into the annulus, provides a solid barrier to retain the insulation, which allows for the relative movement of the inner and outer bends. The polymer is a "syntactic" material, silicone rubber with glass microspheres dispersed through the matrix with high strength, flexibility, and thermal efficiency. The tangent ends of the inner and outer bends are held rigidly to ensure that the assembly tolerances achieved at manufacture are retained when the unit is transferred to the welding contractor for incorporation into the pipeline spool or riser.

In order for the insulation to be effectively deployed and provide the consistent thermal performance, the annular gap throughout the assembly must be uniform. It is important the manufacturing tolerances of the pipe and bends are closely controlled.

Steel pipe and bend manufacture

Together with Tata Steel, Eisenbau Krämer (EBK) and the pipe bending plant of Salzgitter Mannesmann Grobblech (SMGB) have developed a series of controls, including a process and measurement system, to ensure all bend dimensions are closely controlled and mating bends can be produced, matched, and paired to ensure the most accurate assembly is produced.

In respect to the process-related thinning in the extrados of the hot induction bends, the wall thickness for the inner and outer mother pipes was increased accordingly. To match precisely, the mother pipes have been manufactured with the same ID as the riser pipes.

16-in. clad bends being transferred to the quenching tank after austenitization at SMGB pipe bending mill.

16-in. clad bends being transferred to the quenching tank after austenitization at SMGB pipe bending mill.

EBK supplied Tata Steel with the mother pipe, which has material properties that allow formation through hot induction bending. The main material challenges are to ensure the mechanical properties are suitable after bending. Therefore, SMGB is taking responsibility for the chemical design of the pre-material. This also involves the consideration of a series of heat treatment and forming processes. EBK uses a multi-pass welding process and steel plate from premium mills in Europe. The manufacturing process at EBK generates pipe of the closest dimensional control through a series of cold forming and sizing operations such as external calibration.

At the SMGB pipe bending plant, the special mother pipes are bent by hot induction bending. Heat is applied through electrical induction to the mother pipe materials and the pipe is slowly formed to give the correct geometry. In most pipeline applications the critical dimensions are the positions and attitudes of the ends of the bends (center-to-end dimension) to maintain the overall geometry of the pipeline. However, with pipe-in-pipe bends it is important that the bend radius is also accurately controlled to ensure the two bends can be integrated. The precise dimensions after bending also need to be maintained following heat treatment. For the inner clad bends, a full-body quench and temper heat treatment is applied at the SMGB bending mill in order to guarantee homogenized material properties for the bends, to fulfill mechanical and corrosion requirements.

HP/HT material properties

Additional material complexities have to be overcome. Generally, in HP/HT lines there are challenges because of corrosion, low temperature toughness, and strength. These parameters require careful material selection to maintain the balance of properties from the outset through to bend production. Thermal stresses need to be managed as the loads are shared between inner and outer pipe. In addition, the insulation can lead to extremes of temperature being retained in the pipe materials during operation and shutdown that can form challenging conditions for conventional steel products.

Conclusion

HP/HT well environments present some of the most challenging and technologically demanding conditions for field developments, not least because the properties in each reserve offer significant challenges in terms of material selection and design.

Tata Steel and its supply partners have expanded capabilities further with the design and creation of cost-effective insulated pipe-in-pipe bends for risers and spools - an accomplishment previously considered too difficult.

Pipe-in-pipe bends, while challenging technologically, can lead to simplification of overall pipeline design and can give better pipeline performance in times of operation and shutdown.

Reference: “New pipe-in-pipe design ensures effective insulation”, http://www.offshore-mag.com/articles/print/volume-73/issue-4/engineering-construction-installation/new-pipe-in-pipe-design-ensures-effective-insulation.html, January 2014.

Pipeline Buckling and Collapse

With ultra deepwater pipelines being considered for water depths of nearly 3,000 m, pipe collapse, in many instances, will govern design. For example, bending loads imposed on the pipeline near the seabed (sagbend region) during installation will reduce the external pressure resistance of the pipeline, and this design case will influence (and generally govern) the final selection of an appropriate pipeline wall thickness.

To date, the deepest operating pipelines have been laid using the J-lay method, where the pipeline departs the lay vessel in a near-vertical orientation, and the only bending condition resulting from installation is near the touchdown point in the sagbend. More recently, however, the S-lay method is being considered for installation of pipelines to water depths of nearly 2,800 m. During deepwater S-lay, the pipeline originates in a horizontal orientation, bends around a stinger located at the stern or bow of the vessel, and then departs the lay vessel in a near-vertical orientation. During S-lay, the installed pipe experiences bending around the stinger (overbend region), followed by combined bending and external pressure in the sagbend region.


Initial bending in the overbend during pipe installation may result in stress concentrations in pipe-to-pipe weld offsets or in pipe-to-buckle arrestor interfaces.

In light of these bending and external pressure-loading conditions, analytical work was performed to better understand the local buckling behavior of thick-walled line pipe due to bending, and the influence of bending on pipe collapse. Variables considered in the analytical evaluations include pipe material properties, geometric properties, pipe thermal treatment, the definition of critical strain, and imperfections such as ovality and girth weld offset.

Design considerations

As the offshore industry engages in deeper water pipeline installations, design limits associated with local buckling must be considered and adequately addressed. Instances of local buckling include excessive bending resulting in axial compressive local buckling, excessive external pressure resulting in hoop compressive local buckling, or combinations of axial and hoop loading creating either local buckling states. In particular, deepwater pipe installation presents perhaps the greatest risk of local buckling, and a thorough understanding of these limiting states and loading combinations must be gained in order to properly address installation design issues.

Initial bending in the overbend may result in stress concentrations in pipe-to-pipe weld offsets or in pipe-to-buckle arrestor interfaces. Initial overbend strains, if large enough, may also give rise to increases in pipe ovalization, perhaps reducing its collapse strength when installed at depth. Active bending strains in the sagbend will also reduce pipe collapse strength, as has been previously demonstrated experimentally.

Overall modeling approach

In an attempt to better understand pipe behavior and capacities under the various installation loading conditions, the development and validation of an all-inclusive finite element model was performed to address the local buckling limit states of concern during deepwater pipe installation. The model can accurately predict pipe local buckling due to bending, due to external pressure, and to predict the influence of initial permanent bending deformations on pipe collapse. Although model validation is currently being performed for the case of active bending and external pressure (sagbend), no data has been provided for this case.

The finite element model developed includes non-linear material and geometry effects that are required to accurately predict buckling limit states. Analysis input files were generated using our proprietary parametric generator for pipe type models that allows for variation of pipe geometry (including imperfections), material properties, mesh densities, boundary conditions and applied loads.

A shell type element was selected for the model due to increased numerical efficiency with sufficient accuracy to predict global responses. The Abaqus S4R element is a four-node, stress/displacement shell element with large-displacement and reduced integration capabilities.

All material properties were modeled using a conventional plasticity model (von Mises) with isotropic hardening. Material stress-strain data was characterized by fitting experimental, uniaxial test results to the Ramberg-Osgood equation.

Pipe ovalizations were also introduced into all models to simulate actual diameter imperfections, and to provide a trigger for buckling failure mode. This was done during model generation by pre-defining ovalities at various locations in the pipe model.

Bending case

A pipe bend portion of the model was developed to investigate local buckling under pure moment loading. Due to the symmetry in the geometry and loading conditions, only one half of the pipe was modeled, in order to reduce the required computational effort. The pipe mesh was categorized into four regions

  • Two refined mesh areas located over a length of one pipe diameter on each side of the mid-point of the pipe to improve the solution convergence (location of elevated bending strains and subsequent buckle formation)
  • Two coarse mesh areas at each end to reduce computational effort.

Clamped-end boundaries were imposed on each end of the pipe model to simulate actual test conditions (fully welded, thick end plate). Under these assumptions, the end planes (nodes on the face) of both ends of the pipe were constrained to remain plane during bending. Loading was applied by controlled rotation of the pipe ends.

In terms of material properties, the axial compressive stress-strain response tends to be different from the axial tensile behavior for UOE pipeline steels. To accurately capture this difference under bending conditions, the upper (compressive) and lower (tension) halves of the pipe were modeled with separate axial material properties (derived from independent axial tension and compression coupon tests).

In general, the local compressive strains along the outer length of a pipe undergoing bending will not be uniform due to formation of a buckle profile. In order to specify the critical value at maximum moment for an average strain, four methods were selected based on available model data and equivalence to existing experimental methods.

Collapse case

The same model developed for the bending case was used to predict critical buckling under external hydrostatic pressure. This included the use of shell type elements and the same mesh configuration. In the analyses, a uniform external pressure load was incrementally applied to all exterior shell element faces. Radially constrained boundary conditions were also imposed on the nodes at each end of the pipe to simulate actual test conditions (plug at each end). In contrast to the pipe bend analysis, only a single stress-strain curve (based on compressive hoop coupon data) was used to model the material behavior of the entire pipe.

Bending case validation

The pipe bend finite element model was validated using full-scale and materials data obtained from the Blue Stream test program, both for “as received” (AR) and “heat treated” (HT) pipe samples. Geometrical parameters were taken from the Blue Stream test specimens and used in the model validation runs. Initial ovalities based on average and maximum measurements were also assigned to the model. The data distribution reflects the relative variation in ovality measured along the length of the Blue Stream test specimens.


All of finite element models included analysis input files generated using parametric generator for pipe type models that allows for variation of pipe geometry (including imperfections), material properties, mesh densities, boundary conditions, and applied loads.

Axial tension and compression engineering stress-strain data used in the model validation were based on curves fit to experimental coupon test results. As pointed out previously, separate compression and tension curves were assigned to the upper and lower pipe sections, respectively, in order to improve model accuracy.

In the validation process, a number of analyses were performed to simulate the Blue Stream test results (base case analyses), and to investigate the effects of average strain definition, gauge length, and pipe geometry. These analyses, comparisons and results were:

  • The progressive deformation during pipe bending for the AR pipe bend showed the development of plastic strain localization at the center of the specimen
  • A comparison between the resulting local and average axial strain distributions for two nominal strain levels indicated that at the lower strain level the distribution of local strain is relatively uniform, at the critical value (peak moment) a strain gradient is observed over the length of the specimen with localization occurring in the middle, the end effects are quite small due to specimen constraint and were observed at both strain levels
  • The resulting moment-strain response for the AR pipe base case analysis found the calculated critical (axial) strain slightly higher than that determined from the Blue Stream experiments
  • The effect of chosen strain definition and gauge length on the critical bending strain for the AR pipe base case analysis, using the four methods for calculating average strain, gave similar results
  • The critical strain value is somewhat sensitive to gauge length for a variety of OD/t ratios
  • The finite element results are seen to compare favorably with existing analytical solutions and available experimental data taken from the literature. For pipe under bending, heat treatment results in only a slight increase in critical bending strain capacity.

Collapse case validation

Similar to the pipe bending analysis, the plain pipe collapse model was also validated using full-scale and materials data obtained from the Blue Stream test program, both for “as received” (AR) and “heat treated” (HT) pipe samples. Pipe geometry and ovalities measurements taken from the Blue Stream collapse specimens were used in the validation analyses. Initial ovalities based on average and maximum measurements were also assigned to the model at different reference points. Hoop compression stress-strain data was used in the model, and was based on the average of best fit curves from both ID and OD coupon specimens, respectively. To validate the pipe collapse model, comparison was made to full-scale results from the Blue Stream test program which demonstrated a very good correlation between the model predictions and the experimental results.

In addition to the base case, further analyses were run for a number of alternate OD/t ratios ranging from 15 to 35. Similar to the pipe bend validation, the OD/t ratio was adjusted by altering the assumed wall thickness of the pipe. The finite element results have compared favorably with available experimental data taken from the literature.

The beneficial effect of pipe heat treatment for collapse has resulted in a significant increase in critical pressure (at least 10% for an OD/t ratio of 15). The greatest benefit, however, is observed only at lower OD/t ratios (thick-wall pipe). This can be attributed to the dominance of plastic behaviour in the buckling response as the wall thickness increases (for a fixed diameter). At higher OD/t ratios, buckling is elastic and unaffected by changes in material yield strength.

Pre-bent effect on collapse

Finite element analyses were also performed to simulate recent collapse tests conducted on pre-bent and straight UOE pipe samples for both “as received” (AR) and “heat treated” (HT) conditions. The intent of these tests was to demonstrate that there was no detrimental effect on collapse capacity due to imposed bending as a result of the overbend process. In the pre-bend pipe tests, specimens were bent up to a nominal strain value of 1%, unloaded, then collapse tested under external pressure only.


To address the pre-bend effect on collapse, a simplified modeling approach was used whereby the increased ovalities and modified stress-strain properties in hoop compression due to the pre-bend were input directly into the existing plain pipe collapse model (the physical curvature in the pipe was ignored).

To address this loading case, a simplified modeling approach was used whereby the increased ovalities and modified stress-strain properties in hoop compression due to the pre-bend were input directly into the existing plain pipe collapse model (the physical curvature in the pipe was ignored).

A comparison between the predicted and experimental collapse pressures for both pre-bent and straight AR and HT pipes indicates that the model does a reasonable job of predicting the collapse pressure for both pipe conditions. It is also clear that the effect of moderate pre-bend (1%) on critical collapse pressure is relatively small.

While the pre-bend cycle results in an increased ovality in the pipe, this detrimental effect is offset by a corresponding strengthening due to strain hardening. As a result, the net effect on collapse is relatively small. For the AR pipe samples, there was a slight increase in collapse pressure when the pipe was pre-bent. Conversely, for the HT pipe, the opposite trend was observed. This latter decrease in collapse pressure can be attributed to two effects: the larger ovality that resulted from the pre-bend cycle and the limited strengthening capacity available in the HT pipe (the HT pipe thermal treatment increased the hoop compressive strength, offering less availability for cold working increases due to the pre-bend).

Similar to previous experimental studies on thermally aged UOE pipe, the beneficial effect of heat treatment was demonstrated in the pre-bend analysis. The collapse pressure for the pre-bent heat treated (HT) pipe is approximately 8-9% higher than that for the as received (AR) pipe, based on both the analytical and experimental results. This increase, however, is lower than that observed for un-bent pipe (approximately 15-20% based on analysis and experiments).

This unique case of an initial permanent bend demonstrated that the influence on the collapse strength of a pipeline was minimal resulting from an increase in hoop compressive strength (increasing collapse strength), and an increase in ovality (reducing collapse strength). This directly suggests that excessive bending in the overbend will not significantly influence collapse strength.

Future work includes advancing the model validation to the case of active bending while under external pressure. This condition exists at the sagbend region of a pipeline during pipelay and, in many cases, will govern overall pipeline wall thickness design.

Reference: “Understanding pipeline buckling in deepwater applications”, http://www.offshore-mag.com/articles/print/volume-66/issue-11/pipeline-transportation/understanding-pipeline-buckling-in-deepwater-applications.html, Janaury 2014.

Pipeline Crack Propagation

Polyethylene (PE) is the primary material used for gas pipe applications. Because of its flexibility, ease of joining and long-term durability, along with lower installed cost and lack of corrosion, gas companies want to install PE pipe instead of steel pipe in larger diameters and higher pressures. As a result, rapid crack propagation (RCP) is becoming a more important property of PE materials.

This article reviews the two key ISO test methods that are used to determine RCP performance (full-scale test and small-scale steady state test), and compare the values obtained with various PE materials on a generic basis. It also reviews the status of RCP requirements in industry standards; such as ISO 4437, ASTM D 2513 and CSA B137.4. In addition, it reviews progress within CSA Z662 Clause 12 and the AGA Plastic Materials Committee to develop industry guidelines based on the values obtained in the RCP tests to design against an RCP incident.

Background

Although the phenomenon of RCP has been known and researched for several years 1, the number of RCP incidents has been very low. A few have occurred in the gas industry in North America, such as a 12-inch SDR 13.5 in the U.S. and a 6-inch SDR 11 in Canada, and a few more in Europe.

With gas engineers desiring to use PE pipe at higher operating pressures (up to 12 bar or 180 psig) and larger diameters (up to 30 inches), a key component of a PE piping material - resistance to rapid crack propagation (RCP) - becomes more important.

Most of the original research work conducted on RCP was for metal pipe. As plastic pipe became more prominent, researchers applied similar methodologies used for metal pipe on the newer plastic pipe materials, and particularly polyethylene (PE) pipe 2. Most of this research was done in Europe and through the ISO community.

Rapid crack propagation, as its name implies, is a very fast fracture. Crack speeds up to 600 ft/sec have been measured. These fast cracks can also travel long distances, even hundreds of feet. The DuPont Company had two RCP incidents with its high-density PE pipe, one that traveled about 300 feet and the other that traveled about 800 feet.

RCP cracks usually initiate at internal defects during an impact or impulse event. They generally occur in pressurized systems with enough stored energy to drive the crack faster than the energy is released. Based on several years of RCP research, whether an RCP failure occurs in PE pipe depends on several factors:

  1. Pipe size.
  2. Internal pressure.
  3. Temperature.
  4. PE material properties/resistance to RCP.
  5. Pipe processing.

Typical features of an RCP crack are a sinusoidal (wavy) crack path along the pipe, and “hackle” marks along the pipe crack surface that indicate the direction of the crack. At times, the crack will bifurcate (split) into two directions as it travels along the pipe.

Test Methods

The RCP test method that is considered to be the most reliable is the full-scale (FS) test method, as described in ISO 13478. This method requires at least 50 feet of plastic pipe for each test and another 50 feet of steel pipe for the reservoir. It is very expensive and time consuming. The cost to obtain the desired RCP information can be in the hundreds of thousands of dollars.

Due to the high cost for the FS RCP test, Dr. Pat Levers of Imperial College developed the small-scale steady state (S4) test method to correlate with the full-scale test3. This accelerated RCP test uses much smaller pipe samples (a few feet) and a series of baffles, and is described in ISO 13477. The cost of conducting this S4 testing is still expensive, but less than FS testing. Several laboratories now have S4 equipment. A photograph with this article shows the S4 apparatus used by Jana Laboratories.

Whether conducting FS or S4 RCP testing, there are two key results used by the piping industry; one is the critical pressure and the other is the critical temperature.

The critical pressure is obtained by conducting a series of FS or S4 tests at a constant temperature (generally 0C) and varying the internal pressure. At low pressures, where there is insufficient energy to drive the crack, the crack initiates and immediately arrests (stops). At higher pressures, the crack propagates (goes) to the end of the pipe. The critical pressure is shown by the red line in Figure 1 as the transition between arrest at low pressures and propagation at high pressures. In this case, the critical pressure is 10 bar (145 psig).

Figure 1: Critical Pressure (Plot of crack length vs. pressure)
Data obtained at 0° C (32°F).

Due to the baffles in the S4 test, the critical pressure obtained must be corrected to correlate with the FS critical pressure. There has been considerable research within the ISO community conducted in this area. Dr. Philippe Vanspeybroeck of Becetel chaired a working group - ISO/TC 138/SC 5/WG RCP - that conducted S4 and FS testing on several PE pipes 4. Based on their extensive research effort, the WG arrived at the following correlation formula 5 to convert the S4 critical pressure (Pc,S4) to the FS critical pressure (Pc,FS):

Pc,FS = 3.6 Pc,S4 + 2.6 bar (1)

It is important to note that this S4/FS correlation formula may not be applicable to other piping materials, such as PVC or polyamide (PA). For example, Arkema has conducted S4 and FS testing on PA-11 pipe and found a different correlation formula for PA-11 pipe 6.

The critical temperature is obtained by conducting a series of FS or S4 tests at a constant pressure (generally 5 bar or 75 psig) and varying the temperature 7. At high temperatures the crack initiates and immediately arrests. At low temperatures, the crack propagates to the end of the pipe. The critical temperature is shown by the red line in Figure 2 as the transition between arrest at high temperatures and propagation at low temperatures. In this case, the critical temperature is 35°F (2°C).

Figure 2: Critical Temperature (Plot of crack length vs. temperature)
Data obtained at 5 bar (75 psig).

RCP In ISO

The International Standards Organization (ISO) product standard for PE gas pipe, ISO 4437, has included an RCP requirement for many years 8. This is because there were some RCP failures in early generation European PE gas pipes, and the Europeans had conducted considerable research on RCP in PE pipes. Also, European gas companies were using large-diameter pipes and higher operating pressures for PE pipes, both of which make the pipe more susceptible to RCP failures. Below is the current requirement for RCP taken from ISO 4437:

Pc > 1.5 x MOP (2)

Where: Pc = full scale critical pressure, psig
MOP = maximum operating pressure, psig

Most manufacturers use the S4 test to meet this ISO 4437 RCP requirement. If the requirement is not met, then the manufacturer may use the FS test. Therefore, the ISO 4437 product standard requires that RCP testing be done, and also provides values for the RCP requirement.

RCP In ASTM

Until recently, ASTM D 2513 did not address RCP at all 9. The AGA Plastic Materials Committee (PMC) requested that an RCP requirement be added to ASTM D 2513, similar to the RCP requirement in the ISO PE gas pipe standard ISO 4437. The manufacturers agreed to include a requirement in ASTM D 2513 that RCP testing (FS or S4) must be performed. The ASTM product standard D 2513 does not include any required values.

PMC has agreed with this approach and will develop its own industry requirement in the form of a “white paper.” 10 The first draft was just issued within PMC with the following proposed requirement:

  1. PC,FS > leak test pressure.
  2. Leak test pressure = 1.5 X MOP.


RCP In CSA

CSA followed the direction of ASTM. The product standard CSA B137.4 11 requires that the RCP testing must be done. The values of the RCP test will be stipulated in CSA Z662 Clause 12, which is the Code of Practice for gas distribution in Canada. Clause 12 recently approved the requirement as shown nearby.

12.4.3.6 Rapid Crack Propagation (RCP) Requirements

When tested in accordance with B137.4 requirements for PE pipe and compounds, the standard PE pipe RCP Full-Scale critical pressure shall be at least 1.5 times the maximum operating pressure. If the RCP Small-Scale Steady State method is used, the RCP Full-Scale critical pressure shall be determined using the correlation formula in B137.4.
(end of box)

RCP Test Data

The critical pressure is the pressure - below which - RCP will not occur. The higher the critical pressure, the less likely the gas company will have an RCP event. In most cases, as the pipe diameter or wall thickness increases, the critical pressure decreases. Therefore, RCP is more of a concern with large-diameter or thick-walled pipe. Following are some typical critical pressure values for various generic PE materials. For most cases, the pipe size tested is 12-inch SDR 11 pipe.

PE Material S4 Critical Pressure (PC,S4) at 32°F (0°C)/Full Scale Critical Pressure (PC,FS) @ 0°C

Unimodal MDPE 1 bar (15 psig)/6.2 bar (90 psig)
Bimodal MDPE 10 bar (145 psig) /38.6 bar (560 psig)

Unimodal HDPE 2 bar (30 psig)/9.8 bar (140 psig)
Bimodal HDPE (PE 100+) 12 bar (180 psig)/45.8 bar (665 psig)

In general, the RCP resistance is greater for HDPE (high-density PE) than MDPE (medium-density PE). However, there is a significant difference when comparing a unimodal PE to a bimodal PE material, about a ten-fold difference.

Bimodal PE technology was developed in Asia and Europe in the 1980s. This technology is known to provide superior performance for both slow crack growth and RCP, as evidenced by the table. For the bimodal PE 100+ materials used in Europe and Asia, the S4 critical pressure minimum requirement is 10 bar (145 psig), which converts to 560 psig operating pressure. This means that with these bimodal PE 100+ materials, RCP will not be a concern. Today, there are several HDPE resin manufacturers that use this bimodal technology. Recently, a new bimodal MDPE material was introduced for the gas industry 12,13 with a significantly higher S4 critical pressure compared to unimodal MDPE - 10 bar compared to 1 bar.

Another measure of RCP resistance is the critical temperature. This is defined as the temperature above which RCP will not occur. Therefore, a gas engineer wants to use a PE material with a critical temperature as low as possible. Although critical temperature is not used as a requirement in the product standards, it is an important parameter, and perhaps should be given more consideration. Following is a table with some typical critical temperature values for various generic PE materials. For most cases, the pipe size tested is 12-inch SDR 11 pipe.

PE Material/Critical Temperature (TC) at 5 bar (75 psig)

Unimodal MDPE 15°C (60°F)
Bimodal MDPE -2°C (28°F)

Unimodal HDPE 9°C (48°F)
Bimodal HDPE -17°C (1°F)

Again, we see that RCP performance for HDPE is slightly better than MDPE, but there is a significant difference between bimodal PE and unimodal PE. The bimodal MDPE and HDPE materials have the lowest critical temperatures, which means the greatest resistance to RCP.

Conclusion

As gas companies use PE pipe in more demanding applications, such as larger pipe diameters and higher operating pressures, the resistance of the PE pipe to rapid crack propagation (RCP) becomes more important. In this article we have discussed the phenomenon of RCP and the two primary test methods used to determine RCP resistance - the S4 test and the Full Scale test. We reviewed the correlation formula between the FS test and S4 test for critical pressure. We have also discussed the two primary results of RCP testing - the critical pressure and the critical temperature.

ISO standards were the first to recognize the importance of RCP, especially in larger diameter pipe sizes, and incorporated RCP requirements in product standards, such as ISO 4437. The Canadian standards soon followed, and an RCP test requirement has been added to CSA B137.4. The required values for RCP testing are being added to the CSA Code of Practice in CSA Z662 Clause 12 for gas piping. ASTM just added an RCP requirement to its gas pipe standard ASTM D 2513. The corresponding AGA PMC project to develop RCP recommendations for required values from RCP testing is in progress.

In this article, we also discussed some results of RCP testing. In general, the HDPE materials have slightly greater RCP resistance than MDPE materials used in the gas industry. A more significant difference is observed when comparing unimodal PE materials to bimodal PE materials. Existing data indicate that bimodal HDPE materials show a significant increase in critical pressure compared to unimodal HDPE materials and also have considerably lower critical temperature values.

In addition, this bimodal technology has now just been introduced for MDPE. This bimodal MDPE material also has a significantly higher S4 critical pressure (10 bar vs. 1 bar) and a lower critical temperature than unimodal MDPE materials. With several PE resin manufacturers being able to produce bimodal PE materials, it is likely that in the near future, all PE materials used for the gas industry will be bimodal materials because of their superior RCP resistance.

Reference:

“Rapid Crack Propagation Increasingly Important in Gas Applications: A Status Report”, Dr. Gene Palermo, http://pipelineandgasjournal.com/rapid-crack-propagation-increasingly-important-gas-applications-status-report, January 2014.

Pipeline Free Span Analysis and Mitigation

Nowadays, offshore pipelines have a significant role in development of oil and gas industry in different parts of the world. This crucial industry is laid on seabed by various methods either embedded in a trench (buried method) or laid on uneven seabed (unburied method). Construction of unburied pipeline is the most common method for its rapid and economic performance. In this method, however, the pipelines are subjected to various lengths of free spanning throughout the route during its life time, which may threaten the pipelines safety. Free spanning in offshore pipelines mainly occurs as a consequence of uneven seabed and local scouring due to flow turbulence and instability; hence, with no doubt, free spanning occurrences for unburied pipelines are completely inevitable.

Fredsoe and Sumer (1997) assessed the role of free spans in unburied offshore pipelines. They acknowledged the previous studies and mentioned that resonance is the main problem for offshore pipelines laid on the free spanning. Pipelines resonance happens when the external load frequency as a result of vortex shedding becomes equal to the pipe Natural Frequency. This phenomenon may burst the pipe coating and may lead to develop more fatigue on the pipelines. Different design guidelines, e.g. DNV (1998) and ABS (2001), have accepted a less stringent approach and recommend the free spanning to be reduced to the allowable length to avoid fatigue damage. These guidelines proposed a simple formulation to calculate the first Natural Frequency based on the pipelines specifications and seabed conditions; however, all of the guidelines encourages using modal analysis at the final phase of design.

Choi (2000) studied the effect of axial forces on free spanning of offshore pipelines. The results indicated that the axial force has a significant influence on the first Natural Frequency of the pipe. In this research, the different seabed condition has been broken down into three main types and the general beam equation for the boundary conditions was analytically solved. He also compared his result with Lloyd’s approximate formula, which estimates the first Natural Frequency of the beam considering axial load effect. Xu et al. (1999) applied the modal analysis to incorporate the real seabed condition to assess pipelines fatigue and Natural Frequency (NF). Later, Bai (2001) approved Xu et al. (1999) approach and emphasis on applying the modal analysis to determine the allowable length of free span for offshore pipelines.

In practice, a considerable amount of works have been applied to determine the allowable free span length, however, there is still lack of knowledge in assessing the role of all effective parameters in determination of allowable free span length. The objective of this paper is two folds: (i) to assess the role of main effective parameters on Natural Frequency; and (ii) to present a simple formula for allowable free span length with accounting for the seabed condition. To do so, first the approaches of DNV (1998) and ABS guidelines are discussed and then the modal analysis is outlined to have a useful tool to assess the role of all involved parameters. Finally, a case study on the Qeshem pipelines is performed to evaluate the free span allowable length.

During pipeline routing evaluation, consideration has to be given to the shortest pipeline length, environment conservation, and smooth sea bottom to avoid excessive free spanning of the pipeline. If the free span cannot be avoided due to rough sea bottom topography, the excessive free span length must be corrected. Free spanning causes problems in both static and dynamic aspects. If the free span length is too long, the pipe will be over-stressed by the weight of the pipe plus its contents. The drag force due to near-bottom current also contributes to the static load.

To mitigate the static span problem, mid-span supports, such as mechanical legs or sand-cement bags/mattresses, can be used. Free spans are also subject to dynamic motions induced by current, which is referred to as a vortex induced vibration (VIV). The vibration starts when the vortex shedding frequency is close to the natural frequency of the pipe span. As the pipe natural frequency is increased, by reducing the span length, the VIV will be diminished and eliminated. Adding VIV suppression devices, such as strakes or hydrofoils, can also prevent the pipe from vibrating under certain conditions. The VIV is an issue even in the deepwater field since there exists severe near-bottom loop currents. To prevent static and dynamic spanning problems, a number of offshore pipeline spanning mitigation methods in Table 3 have been identified. Based on soil conditions, water depth, and span height from the seabed, the appropriate method should be selected. If the span off-bottom height is relatively low, say less than 1 m (3 ft), sand-cement bags or mattresses are recommended. If the span off-bottom height is greater than 1 m (3 ft), clamp-on supports with telescoping legs or auger screw legs are more practical.

References:

Bakhtiary, Abbas Yeganeh, Abbas Ghaheri, Reza Valipour. 2007. “Analysis of Offshore Pipeline Allowable Free Span Length”.

http://www.jylpipeline.com, January 2014.

Pipeline Hot Tap

Hot Taps or Hot Tapping is the ability to safely tie into a pressurized system, by drilling or cutting, while it is on stream and under pressure.

Typical connections consist:

  • Tapping fittings like Weldolet®, Reinforced Branch or Split Tee.
    Split Tees often to be used as branch and main pipe has the same diameters.
  • Isolation Valve like gate or Ball Valve.
  • Hot tapping machine which includes the cutter, and housing.

Mechanical fittings may be used for making hot taps on pipelines and mains provided they are designed for the operating pressure of the pipeline or main, and are suitable for the purpose.

  • Design: ANSI B31.1, B31.3, ANSI B31.4 & B31.8, ASME Sec. VIII Div.1 & 2
  • Fabrication: ASME Sec. VIII Div.1
  • Welding: ASME Sec. IX
  • NDT: ASME Sec. V

There are many reasons to made a Hot Tap. While is preferred to install nozzles during a turnaround, installing a nozzle with equipment in operation is sometimes advantageous, especially if it averts a costly shut down.

Remarks before made a Hot Tap

  • A hot tap shall not be considered a routine procedure, but shall be used only when there is no practical alternative.
  • Hot Taps shall be installed by trained and experienced crews.
  • It should be noted that hot tapping of sour gas lines presents special health and metallurgical concerns and shall be done only to written operating company approved plans.
  • For each hottap shall be ensured that the pipe that is drilled or sawed has sufficient wall thickness, which can be measured with ultrasonic thickness gauges. The existing pipe wall thickness (actual) needs to be at least equal to the required thickness for pressure plus a reasonable thickness allowance for welding. If the actual thickness is barely more than that required for pressure, then loss of containment at the weld pool is a risk.
  • Welding on in-service pipelines requires weld procedure development and qualification, as well as a highly trained workforce to ensure integrity of welds when pipelines are operating at full pressure and under full flow conditions.

Hot Tap fittings

Hot Tap setup

For a hot tap, there are three key components necessary to safely drill into a pipe; the fitting, the Valve, and the hot tap machine. The fitting is attached to the pipe, mostly by welding.
In many cases, the fitting is a Weldolet® where a flange is welded, or a split tee with a flanged outlet (see image above).
Onto this fitting, a Valve is attached, and the hot tap machine is attached to the Valve (see images on the right). For hot taps, new Stud Bolts, gaskets and a new Valve should always be used when that components will become part of the permanent facilities and equipment.
The fitting/Valve combination, is attached to the pipe, and is normally pressure tested. The pressure test is very important, so as to make sure that there are no structural problems with the fitting, and so that there are no leaks in the welds.
The hot tap cutter, is a specialized type of hole saw, with a pilot bit in the middle, mounted inside of a hot tap adapter housing.
The hot tap cutter is attached to a cutter holder, with the pilot bit, and is attached to the working end of the hot tap machine, so that it fits into the inside of the tapping adapter.
The tapping adapter will contain the pressure of the pipe system, while the pipe is being cut, it houses the cutter, and cutter holder, and bolts to the Valve.

Hot Tap operation

The Hot Tap is made in one continuous process, the machine is started, and the cut continues, until the cutter passes through the pipe wall, resulting in the removal of a section of pipe, known as the "coupon".
The coupon is normally retained on one or more u-wires, which are attached to the pilot bit. Once the cutter has cut through the pipe, the hot tap machine is stopped, the cutter is retracted into the hot tap adapter, and the Valve is closed.
Pressure is bled off from the inside of the Tapping Adapter, so that the hot tap machine can be removed from the line. The machine is removed from the line, and the new service is established.

Hot Tap Coupon

The Coupon, is the section of pipe that is removed, to establish service. It is very highly desirable to "retain" the coupon, and remove it from the pipe, and in the vast majority of hot taps, this is the case.
Please note, short of not performing the hot tap, there is no way to absolutely guarantee that the coupon will not be "dropped".
Coupon retention is mostly the "job" of the u-wires. These are wires which run through the pilot bit, and are cut and bent, so that they can fold back against the bit, into a relief area milled into the bit, and then fold out, when the pilot bit has cut through the pipe.
In almost all cases, multiple u-wires are used, to act as insurance against losing the coupon.

Line Stopping

Line Stops, sometimes called Stopples (Stopple® is a trademark of TD Williamson Company) start with a hot tap, but are intended to stop the flow in the pipe.
Line Stops are of necessity, somewhat more complicated than normal hot taps, but they start out in much the same way. A fitting is attached to the pipe, a hot tap is performed as previously detailed. Once the hot tap has been completed, the Valve is closed, then another machine, known as a line stop actuator is installed on the pipe.
The line stop actuator is used to insert a plugging head into the pipe, the most common type being a pivot head mechanism. Line stops are used to replace Valves, fittings and other equipment. Once the job is done, pressure is equalized, and the line stop head is removed.
The Line Stop Fitting has a specially modified flange, which includes a special plug, that allows for removal of the Valve. There are several different designs for these flanges, but they all work pretty much the same, the plug is inserted into the flange through the Valve, it is securely locked in place, with the result that the pressure can be bled off of the housing and Valve, the Valve can then be removed, and the flange blinded off.

Line Stop setup

The Line Stop Setup includes the hot tap machine, plus an additional piece of equipment, a line stop actuator. The Line Stop Actuator can be either mechanical (screw type), or hydraulic, it is used, to place the line stop head into the line, therefore stopping the flow in the line.
The Line Stop Actuator is bolted to a Line Stop Housing, which has to be long enough to include the line stop head (pivot head, or folding head), so that the Line Stop Actuator, and Housing, can be bolted to the line stop Valve.
Line stops often utilize special Valves, called Sandwich Valves.
Line Stops are normally performed through rental Valves, owned by the service company who performs the work, once the work is completed, the fitting will remain on the pipe, but the Valve and all other equipment is removed.

Line Stop operation

A Line Stop starts out the same way as does a Hot Tap, but a larger cutter is used,.
The larger hole in the pipe, allows the line stop head to fit into the pipe.
Once the cut is made, the Valve is closed the hot tap machine is removed from the line, and a line stop actuator is bolted into place.
New gaskets are always to be used for every setup, but "used" studs and nuts are often used, because this operation is a temporary operation, the Valve, machine, and actuator are removed at the end of the job.
New studs, nuts, and gaskets should be used on the final completion, when a blind flange is installed outside of the completion plug.
The line stop actuator is operated, to push the plugging head (line stop head), down, into the pipe, the common pivot head, will pivot in the direction of the flow, and form a stop, thus stopping the flow in the pipe.

Completion Plug

In order to remove the Valve used for line stop operations, a completion plug is set into the line stop fitting flange (Completion Flange).
There are several different types of completion flange/plug sets, but they all operate in basically the same manner, the completion plug and flange are manufactured, so as to allow the flange, to accept and lock into place, a completion plug.
This completion plug is set below the Valve, once set, pressure above the plug can be bled off, and the Valve can then be removed.
Once the plug has been properly positioned, it is locked into place with the lock ring segments, this prevents plug movement, with the o-ring becoming the primary seal.
Several different types of completion plugs have been developed with metal to metal seals, in addition to the o-ring seal.

Line Stopping
Procedure

All following images are from Furmanite.
They are a little matched to the style
of this website requirements.

Line StopLine StopLine StopLine StopLine StopLine Stop
Line StopLine Stop

Line StopLine Stop
Line StopLine Stop
Line StopLine StopLine StopLine Stop
Line Stop

Reference:

“Introduction to Hot Tapping and Line Stopping”. http://www.wermac.org/specials/hottap.html. January 2014.

Soil-Pipeline Interaction Using FEM

Offshore pipelines laid on the seabed are exposed to hydrodynamic and cyclic operational
loading. As a result, they may experience on-bottom instabilities, walking and lateral
buckling. Finite element simulations are required at different stages of the pipeline design to
check the different loading cases. Pipeline design depends on accurately modelling axial and
lateral soil resistances.
 
Conventional pipeline design practice is to model the interaction between the pipe and the
seabed with simple “spring-slider” elements at intervals along the pipe, as finite element
methods with elaborated contact and interface elements between the pipeline and the
foundation do not allow for comprehensive modeling of long pipeline systems with current
computational power (Tian et al, 2008). These “spring-slider” elements provide a bi-linear,
linear-elastic, perfectly plastic response in the axial and lateral directions. The limiting axial
and lateral forces are based on empirical friction models, which relate axial and lateral
resistance to the vertical soil reaction by using a “friction factor”. In the vertical direction, a
non-linear elastic load embedment response derived from bearing capacity theory is usually
assumed, the pipeline being treated as a surface strip foundation of width equal to the chord
length of pipe-soil contact at the assumed embedment.

These simple models can be adequate for sand but are too simplistic for clay, especially soft clay. Due to the slow rate of consolidation of clay, a total stress approach using an undrained
shear strength su should be employed. In this case, the axial and lateral resistances do not directly depend on the vertical soil reaction but on the contact area between the pipe and the
seabed. As a result, an accurate prediction of the pipeline embedment, which can be large in
very soft cay, becomes of primary importance.
 
These simple models were improved to better predict pipeline embedment and axial and
lateral resistances and were implemented in a Finite Element software program for pipeline
analysis to better simulate the pipe-soil interaction of surface laid pipelines in soft clay and to
more accurately simulate full routes. The new features are briefly explained in this paper. A
more recent pipe-soil vertical reaction law that models plastic unloading is built into the
program. It considers lay and dynamic installation effects to compute a more representative
pipeline embedment. Axial and lateral resistance is now linked to pipeline embedment.
Finally, peak-residual axial and lateral reaction laws are implemented.

Vertical reaction law
 
Solutions for estimating the resistance profile have been provided by Murff et al. (1989),
Aubeny et al. (2005) and Randolph & White (2008). The pipeline penetration z may be
estimated from the conventional bearing capacity equation, modified for the curved shape of
a pipeline:

image

where V is the vertical load per unit length, D is the pipeline diameter, su the undrained shear
strength at the pipeline invert and As the nominal submerged area of the pipeline crosssection.
For design, the bearing capacity factor Nc can be estimated using rounded values of
the power law coefficients a and b, for example a = 6 and b = 0.25 (Randolph & White,
2008). Buoyancy has an influence in extremely soft soil conditions. This is captured by the
buoyancy factor Nb. The factor fb should be taken equal to 1.5 because of heave (Randolph
& White, 2008).

The accuracy of this calculation approach, of the order of +/- 10%, is sufficient given the
other uncertainties such as the installation effects, which influence the vertical load V (see
below) (White & Randolph, 2007).

Installation effects
During installation of a pipeline, the vertical and horizontal motion of the lay barge and the
load concentration at pipe touch-down will yield larger penetration than calculated based on
the pipe submerged unit weight. The load concentration can be taken into account by
multiplying the pipe weight by an amplification factor flay as proposed by Bruton (2006). In
order to take into account the effect of pipe motion during installation, a partially remoulded
shear strength can be used to compute the pipe embedment, as proposed by Dendani &
Jaeck (2007), instead of the intact strength. These features combined with the vertical
reaction law described above allow predicting a more realistic pipeline embedment, which is
of primary importance to compute a realistic axial and lateral resistance.

Plastic unloading
A non-linear elastic load embedment response is conventionally assumed for the vertical soil
spring. However, it is essential to model a spring as behaving plastically to avoid predicting
an unrealistic rebound when the pipe is unloaded. In practice, a pipe is often overpenetrated,
meaning that its operating weight is lower than the maximum vertical force that
had been applied to it. In effect, it has been unloaded. It is important to model a spring with
plastic behaviour and “memory” to calculate the appropriate vertical soil stiffness. The
behaviour of an over-penetrated pipe can be described by the stiff unload-reload line. When
reloaded to its normally-penetrated range, the pipe’s behaviour can be described as following
the virgin load embedment curve. This is illustrated in the example below and in Figure 1.
Let us first consider an elastic spring. During installation, the pipe moves to A1 due to load
concentration and then rebounds to A2, to a vertical displacement corresponding to its
submerged empty weight. During the hydrotest, the vertical force increases and the pipe
moves to B. During operational conditions, if the content is lighter than water, the pipe is
unloaded to point C. The pipe embedment and the tangent stiffness at this point are not
realistic. In the case of an elasto-plastic spring, the pipe goes to A1 during installation and
then to A2* following an unload-reload line. During the hydrotest, the vertical force increases
to B* along the unload-reload line. Finally, the pipe is unloaded to C*. At this point, the
pipeline embedment and the tangent stiffness are more realistic. An accurate pipe
embedment is especially important when it is coupled to axial and lateral resistance (see
next Section).

image

Figure 1 – Behaviour of non-Linear Elasto-Plastic Vertical Springs

Coupling of axial and lateral resistance with pipeline embedment
The axial and lateral resistances depend on the contact area between the pipe and the
seabed and thus the pipe embedment, when a total stress approach is followed. The formula
used to compute peak axial and lateral resistances Fpa and Fpl are in the form:

image

where αsu is the unit interface shear resistance, Ac is the area of contact between the pipe
and the seabed which is a function of the pipe embedment z, μ is a “friction factor” in the
range 0.2-0.8 (Randolph & White, 2007) and λ a coefficient typically in the range 0.5-2.
The axial and lateral resistances have been linked to the pipeline embedment so that they
are automatically calculated and can change during the analysis.


Tri-linear axial and lateral model
Models of the simple bi-linear frictional axial and lateral springs were improved so they can
use peak and residual resistances to model the softening of the axial and lateral response
often observed in clay. As explained earlier, pipelines are often over-penetrated in practice.
When this occurs in soft clay, lateral breakout resistance Fpl, is high and drops sharply when
suction at the rear face of the pipe is lost, then decreases further to a residual value Frl as
the pipe rises to a shallower embedment. When the residual resistance is reached, the
lateral resistance may increase again because a soil berm forms in front of the pipe (see
Figure 2). The axial resistance may experience strain softening as well due to suction
release and clay remoulding.

image

Figure 2 – Tri-linear Lateral Resistance Model

Conclusions
Simple soil models conventionally used in pipeline design practice have been improved and
implemented in a Finite Element software program for pipeline analysis. There are several
improvements. A more recent pipe-soil vertical reaction law that models plastic unloading is
built into the program. It considers lay and dynamic installation effects to compute a more
representative pipeline embedment. Axial and lateral resistance is now linked to pipeline
embedment. Finally, peak-residual axial and lateral reaction laws have been implemented.
The new features are basic but important first steps towards more accurate full route
simulations, especially those in soft clay.


References:

Ballard, Jean-Christophe, Hendrik Falepin, Jean-François Wintgens. 2009. “Towards More Advanced Pipe-Soil Interaction Models in Finite Element Pipeline Analysis”. Belgium: Fugro.

Pipeline Bend Computer Simulation

The induction bending process for large-diameter pipes is very popular technology. An important problem in the bending process is prediction and improvement of the bending quality. In this article, a thermo-elastic-plastic mechanical model is used to simulate induction bending of large-diameter pipes. The bending experiments of the API 5L X65 induction bend pipes were performed to clarify the deformation behavior of the pipes. The large deformation behaviors of these experiments were simulated by finite element method, using ADINA software.

sim1

Triple D Bending has been bending pipe for 26 years and induction bending for seven years. Customer specifications and requirements for material properties are becoming increasingly stringent and the company is continually improving processes to meet these requirements. For some customer applications, ovality of the pipe bends is of major concern. For this reason Triple D Bending desired to have a method of predicting the ovality of completed bends in order to find ways to improve the ovality of the pipe bends.

In pipe production, pipe bending using local induction heating is an advanced technique to produce large diameter pipes with a large or small bend radius.

Induction bending as a technique is relatively quick and cheap, but induction bending can produce unwanted changes in geometry such as wall thinning at the extrados, wall thickening and wrinkling at the intrados, and steep transitions in wall thickness between tangent and bend. These problems increase in severity as the bend radius is reduced. However, there are a lot of other problems, such as springback and cross-section ovality when bending thinwall pipe with a large diameter.

  • Pipe diameter ØD = 30-inches (762 mm),
  • Wall thickness t = 0.562 inch (14.27 mm),
  • Material     API 5L X65,
  • Bend radius     R = 189 inches (4800 mm),
  • Bend angle     φ= 90°.

The fundamental tasks which had to be solved can be summarized as follows:

  • material characteristics identification;
  • implementation of material characteristics into computational model;
  • finite element modelling (geometry, definition of thermal contact problem, thermo-plasticity and large strain analysis);
  • FE stress, strain, displacement analysis;
  • computational ovality prediction.

Line pipe for constructing oil and gas pipelines is made from steel, and in particular, either low-carbon steel or low-alloy steel. Low-carbon or low-alloy steels are suitable for line pipe materials and most other steel structures such as buildings or bridges because they provide a durable, strong material to withstand the service loads imposed on such structures. Other iron-based materials such as wrought iron and cast iron are either too low strength or too brittle to function well as structural materials.

Stainless or high-alloy steels are essential for special applications such as in high-temperature piping and pressure vessels or tool steels, but they are not suitable and cannot be made economically in the quantities needed for use in structures including pipelines. Only low-carbon steels or low-alloy steels offer the appropriate ranges of desirable properties (i.e., strength, toughness, ductility and weldability) that are required for structural applications.

The performance of steels depends on the properties associated with their microstructures. Each type of microstructure and product is developed to characteristic property ranges by specific processing routes that control and exploit microstructural changes. Carbon steels and low-alloy steels with ferrite-pearlite or ferrite-bainite microstructures are used extensively at elevated temperatures. Carbon steels are often used up to about 370ºC under continuous loading, but also have allowable stresses defined up to 540ºC. Effect of elevated-temperature exposure on the room-temperature tensile properties of normalized 0.17% C steel after exposure (without stress) to indicated temperature for 83,000 hours is shown in Figure 1.

The allowable design stresses for steels at elevated temperatures may be controlled by different mechanical properties, depending on the application and temperature exposure.

In designing components that are to be produced from low-alloy steels and to be exposed to temperatures up to 370ºC, the yield and ultimate strengths at the maximum service temperature can be used much as they would be used in the design of components for service at room temperature.

During operation, microstructure of experimental steel XH API 5L X65 is exposed to different levels of temperatures, thus we need to account for the influence of temperature on the behavior of this structural steel. Mechanical properties of a structural steel vary with temperature. In material behavior, changes in temperature can cause the following effects: 1) elastic constants (e.g., E, ν) of the material can change; 2) strain can develop without mechanical loading; 3) material yield strength decreases with increase in temperature; and 4) the material can lose ductility with decrease in temperature.

For the material properties, analysis at room and elevated temperatures were selected as the experimental methods – mechanical properties tests (tensile test) and mathematical approximation of statistical data. The results, tensile test at room temperature and other mechanical characteristics are presented in Table 1.

Table 1: Mechanical properties of API 5L X65 at room and elevated (850ºC) temperature.

simtable

For many structural materials, a change in temperature of a few tens of degrees Celsius from room temperature may not result in much change in the elastic constants. At high enough temperatures, the stiffness and strength of structural steels may be reduced even if the ductility increases. Elevated temperature values of elastic modulus can be determined during tensile testing or dynamic testing. Figure 2 a) shows values of elastic modulus API 5L X65 between room temperature and elevated temperature. The influence of elevated temperature on Yield strength, Ultimate tensile strength and Poisson’s ratio are shown in Figure 2 a) to Figure 2 d). These results were determined during static tensile loading and the statistical data obtained using mathematical approximation.

sim2sim2-2sim2-3sim2-4

Figure 2 a), b), c), d): Effect of elevated temperature on mechanical characteristic API 5L X65.

Final values of mechanical parameters at the temperature of 850ºC were obtained from extrapolated curve lines shown in Figure 3, where: σ is engineering stress, ε is engineering strain, E is modulus of elasticity or Young’s modulus at room temperature, E850ºC is modulus of elasticity or Young’s modulus at elevated temperature, H is isotropic hardening modulus at room temperature, and H850ºC is isotropic hardening modulus at elevated temperature. These values were used as input parameters for the FEM analysis of bending process.

sim3

Figure 3: Schematic view of temperature dependent material bilinear model.

Computational Assumptions
The finite element method was used for modeling the process of induction bending (Figure 4). The computational model contains the following assumptions:

  • The model is built as a half model satisfying symmetrical, boundary and initial conditions.
  • They are considered large displacements and large strains (enable to model the shape changes and plasticity during calculation).
  • A temperature dependent material bilinear model is needed (Figure 3).
  • Induction heating is substitute by heat transfer in contact between bodies (in inductor position, bodies which come into contact by pipe have temperature equal 850˚C, occur heating of pipe material). Contact is modeled without friction and contact pressure is considered 1 MPa.
  • Water cooling system is substitute by heat transfer in contact between bodies (in water cooling system position, bodies which come into contact by pipe have temperature equal 20˚C, occur cooling of pipe material). Contact is modeled without friction and contact pressure is 1 MPa.
  • Guiding devices are substitute by tight contact surface which come into contact with pipe during simulation, contact is modelled without friction.
  • The movement of the pipe is imposed in the free end by velocity equal 0.0018 m s-1.
  • The solution time is 18,720 seconds and corresponds to bending of pipe about 90˚.
  • Pipe diameter is 762 mm, wall thickness is 14.27 mm and bending radius is 4,800 mm.

sim4

Figure 4: Finite element model of induction bending process.

Necessary inputs for modeling of technological process of the induction bending of pipes:

  • accurate geometrical characteristics of device (inductor position, water cooling system position, pipe diameter, wall thickness, bending radius, guiding device position, displacement velocity, initial temperature of pipe);
  • material characteristics (Young’s modulus, Poisson’s ratio, Yield strength, isotropic hardening modulus, coefficient of thermal expansion) for temperature range 20 - 850˚C.

Finite Element Modeling Process
The modeling process is realized by using the “classic” finite element computational approach. The Grab mechanism is substituted by a set of solid elements inside the pipe. The bending arm is modeled as two rigid truss elements (Figure 4). These trusses are connected to pin (center of the bending) and solid elements substitute for the grab mechanism. There is in the pin no degree of freedom. In this manner, the bending arm, grab mechanism and pipe may freely rotate around the pin. The grab mechanism is modelled as one layer of solid elements inside the pipe. Low number of elements is used to simulate the bending arm and the grab mechanism, reducing bandwidth of the stiffness matrix [2,6].

The induction bending process is characterized by energy lost from the material surface to the environment. Conduction, convection and radiation cause non-constant temperature distribution across the pipe wall. In order to determine the temperature difference between the outer and inner wall surfaces a thermal FE analysis was performed. There are two thermal boundary conditions applied. First is boundary convection, second is boundary radiation. These boundary conditions are applied on the inner and outer face of the pipe. Application of these boundary conditions and heating mechanism causes the temperature gradient from the outer to the inner face of the pipe. These differences of surface temperatures are low and therefore it can be neglected.

The chosen results of the computational simulation are presented in Figure 5 and Figure 6. Ovalization of the pipe cross-section shall be limited in design to prevent section collapse. The pipe diameter changes are evaluated in two directions: first is in the radial direction, second is in the binormal direction. These changes of diameters are dependent on the angle of the bending arm (Figure 7). The pipe was 30-inch/762 mm - API 5L X65. The applied bending angle was taken from range 0 to 90 degrees. Bend radius was 4800 mm and wall thickness was 0.562 inch / 14.27 mm.

sim5

Figure 5. Distribution of plastic strains (plastic deformation).

sim6

Figure 6: Von Mises stress distribution after bending process.

sim7

Figure 7. Ovality behavior measured during induction bending test realized by computational finite element analysis.

Conclusion
This article presents finite element analysis of the complicated technological problem. The results of the analysis provide information about shape (diameter) changes of the bending pipe. The computational process complicates temperature dependence of the material characteristics and the substitution of induction heating.

Induction heating is a physically complex action. Modeling of this process is not included in FEM software for such structural problems. For this reason it is necessary to substitute induction heating by contact between bodies with heat transfer. Using this substitution simplifies the whole FE model; on the other hand, this solution has the right accuracy.

The main goal of this material has been to present the possibilities of the finite element analysis in the induction bending process of large-diameter pipes. The results of the introduced simulation approach can be summarized as follows: 1) analysis of the residual stress, strain and displacement distribution in pipe; 2) analysis of the plastic stress, strain and displacement distribution in pipe; 3) analysis of the temperature distribution; and 4) analysis of the pipe shape modification – ovality modification.


References: “Computer Simulation of Induction Bending Process”. http://pipelineandgasjournal.com/computer-simulation-induction-bending-process. January 2014.